
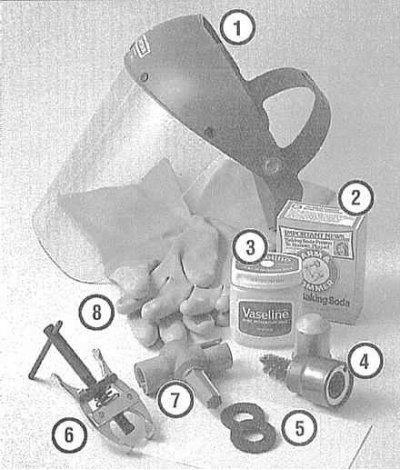
Tools and materials needed for battery maintenance
1 - Face shield/safety glasses - when removing traces of corrosion with a stiff brush, crystallized acid particles can easily get into the eyes.; 2 - Baking soda - a water solution of baking soda is used to neutralize traces of corrosion.; 3 - Acid-free Vaseline - Lubricating the battery terminals will help prevent future corrosion.; 4 - Battery Terminal/Wire Terminal Stripper - Specially shaped stiff wire brush heads help effectively strip battery terminals and terminal clamps.; 5 - Impregnated felt washers - installing such a washer directly under the terminal clamp will prevent the development of corrosion.; 6 - Puller - sometimes the wire clamps are seated on the terminals very tightly and cannot be removed even if the fasteners are completely released.; 7 - Battery terminal/wire end stripper - although different in design from that mentioned in item 4, it is designed to perform the same tasks.; 8 - Rubber gloves - the importance of this protective equipment should not be underestimated - do not forget that the battery contains sulfuric acid!
Warning! Carrying out battery checks and maintenance requires some special precautions. Remember that the hydrogen released by the electrolyte is a highly explosive gas. Do not smoke or approach the work site with an open flame or a lit cigarette! Do not forget that the electrolyte itself is diluted sulfuric acid, which can cause severe chemical burns if it gets into your eyes or on exposed areas of the body. The electrolyte can also easily damage clothing fabric and the paintwork of body panels!
When disconnecting the battery, always disconnect the negative cable first - it should be connected last!
Preparation
Conscientious attitude to the implementation of routine preventive maintenance procedures for the battery is the only guarantee of a quick and trouble-free engine start. Before you start servicing the battery, make sure you have all the necessary materials and tools at hand to ensure the safety of the work.
There are also a number of additional precautions that must be taken when servicing the battery. Before starting work, be sure to turn off the engine and all electrical consumers. Disconnect the negative cable from the battery.
Remember that hydrogen is released in the battery cans, which is not only flammable but also explosive. Never approach the work site with an open flame or a lit cigarette, try to use only non-sparking tools. Charge the battery in a well-ventilated area.
The electrolyte is a solution of sulfuric acid, which is not only a toxic chemical compound, but is also a highly chemically aggressive substance. Do not allow the electrolyte to come into contact with your eyes, exposed areas of the body, or clothing. When servicing the battery, wear protective glasses and gloves, and do not allow children to approach the work site.
Examine the external condition of the battery. If the positive battery terminal with the clamp on it is equipped with a rubber protective cover, make sure that the latter is not damaged. The cover must completely cover the metal components of the terminal connection. Check the condition and reliability of the terminal connections, inspect the cover and battery cover for cracks and other mechanical damage. Make sure that the clamping bolts are securely fastened. Assess the condition of the insulation of the battery wires along their entire length.
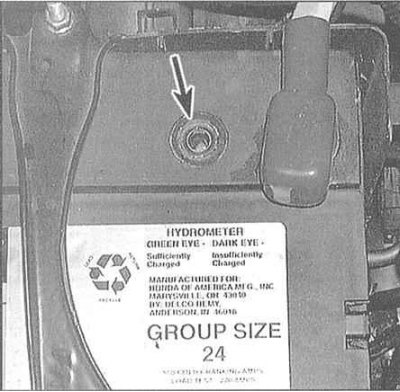
Some models are equipped with sealed batteries equipped with a charge level indicator. Compare the color of the indicator spot in the viewing window with the indicator status map printed on a special label pasted to the battery case. Check the battery status regularly and charge it in a timely manner if necessary.
Service
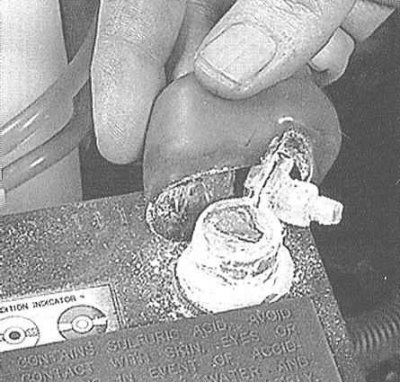
1. If traces of corrosion in the form of a white powdery coating are found on the surface of the battery, especially near the terminals, the battery must be removed from the vehicle for a thorough external cleaning.
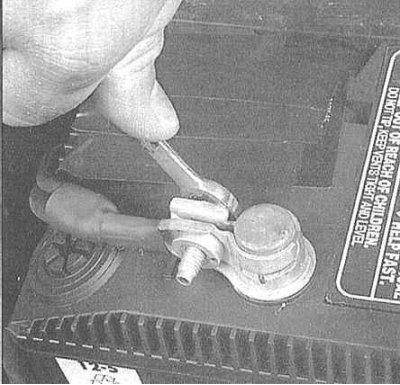
2. Loosen the terminal clamp bolts with a wrench (negative first!) and carefully disconnect the wires from the battery. Release the clamping bar fastener, lift the latter and remove the battery from the engine compartment.
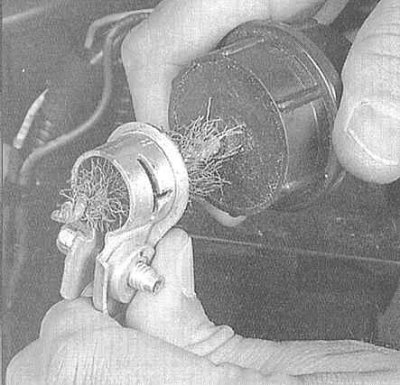
3. Carefully clean the contact surfaces of the terminal clamps of the wires and the battery terminals with special brushes using a solution of baking soda. Clean the battery terminals with the same solution and wash the surface of its cover. Make sure that the solution does not get inside the jars. Clean in a protective mask/glasses and rubber gloves to avoid getting acid particles in your eyes and on your hands. Also try to choose appropriate clothing that you will not mind throwing away later. After finishing cleaning, rinse the treated surfaces with clean water.
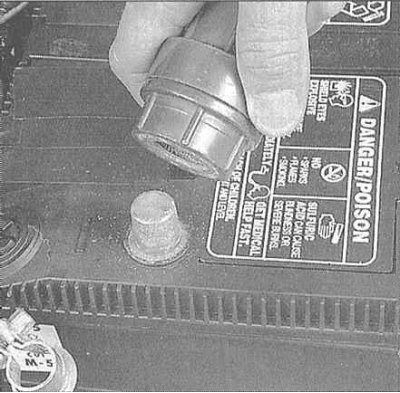
4. Check the condition of the battery tray and the clamping bar mounting studs. Wash the tray with a solution of baking soda, treat the areas damaged by corrosion with a zinc-based primer.
5. Before installing the battery, make sure that no tools or materials are left on the tray. Do not overtighten the clamping bar fasteners.
6. To protect the terminal connections from corrosion, place specially treated felt washers on the battery terminals. After connecting the wires, cover the terminal assemblies with acid-free petroleum jelly. Remember that the negative wire is always connected last!
7. Make sure the clamp fasteners are tightened securely.
Charger
Warning! During charging, the battery cells release highly flammable and fire hazardous hydrogen! Do not smoke or bring open flames to the charging area. Wear protective glasses when approaching the battery installation area. Before connecting or disconnecting the battery from the charger, make sure the device is disconnected from the power supply.
Note: The authors of this Manual recommend charging the battery outside the vehicle, as the gas released during the procedure is chemically aggressive towards paintwork. Remember that performing a quick charge without disconnecting the wires from the battery may result in failure of the vehicle's electrical components.
The best way to restore the battery charge level, when it is discharged to such a degree that it is no longer capable of starting the engine, is to slowly charge it. This method of charging is also most favorable for batteries of cars used for short trips. Maintaining the battery charge level is especially important in winter, when the most unfavorable conditions are created in terms of battery load, as well as during difficult engine starts and increased intensity of operation of electricity consumers.
It is best to use a device for continuous charging with a small current (1÷2 A), sometimes also called a trickle charger). Such chargers provide the most favorable mode of battery charging with a minimum load on the latter. For faster battery charging, you can use a power source with a higher current, remember, however, that the maximum permissible charging current should not exceed 1/10 of the battery capacity (its ampere-hour characteristics). With forced charging, which, according to some users, allows you to restore the charge level in one or two hours, the load on the battery becomes so high that it often fails irreversibly - try to avoid this method of charging, resorting to it only in extreme emergency situations.
The average duration of the battery charging period should be specified in the instructions supplied with the charger. Typically, it is between 12 and 16 hours.
Remove the caps from all battery cans (if any) and plug the openings with a clean rag to prevent electrolyte from spilling out. Disconnect the negative cable from the battery and, observing polarity, connect the clamps of the charger cable tips to the battery terminals (positive to positive, negative to negative). Plug the charger into the network. If the device is equipped with a selector switch, make sure that it is set to 12 V.
When using a power source with a charging current greater than two amperes, check the battery regularly to ensure that it does not overheat. During slow charging, after the initial two-hour check, the battery can safely be left to charge unattended overnight.
If the jars of the battery being charged are equipped with filler necks with removable caps, try to check the specific gravity of the electrolyte every hour during the first few hours of charging. Many manufacturers produce fairly inexpensive devices called hydrometers specifically for this purpose, which can be purchased at almost any car accessory store. When using a hydrometer, follow the manufacturer's instructions. Continue charging the battery until the density of the electrolyte stops changing during the last two hourly measurements, provided that it "boils" (bubbles) freely in the jars. Remember that in a serviceable battery, the difference between the specific gravities of the electrolyte in all the jars should be very small.
Some batteries are placed in a sealed case and equipped with a built-in hydrometer, allowing you to visually determine the battery charge level by the color of the color spot in the viewing window of the case. Usually, a bright color of the color spot indicates a high battery charge level; a darkening of the spot indicates that the battery needs recharging.
In sealed case batteries without a built-in hydrometer (charge level indicator), the charge level can be checked by connecting a voltmeter to the battery terminals. The output voltage of a fully charged battery should be at least 12.6 V after removing the surface charge.
(The article is based on information from the website: hondabook)