HondaBook.ru
Auto companies Volkswagen Auto companies Ford Auto companies Lada Auto companies Skoda Auto companies BMW Auto companies Mazda Auto companies Peugeot
English Русский
Български
Беларускі
Український
Српски
Hrvatski
Română
Polski
Slovenský
Magyar
Bookmark Contacts Sitemap   


Accord Civic Fit / Jazz CR-V HR-V Others Articles
Avancier 1 (1999-2003, petrol)

Electrical fault diagnostics — diagnostic description (Honda Avancier 1)

  • Main
  • Honda
  • Avancier 1 (1999-2003, petrol)
  • Transmission
  • Automatic gearbox
  • Electrical fault diagnostics — diagnostic description
0
Contents: D indicator flashing ⇊ Error codes ⇊
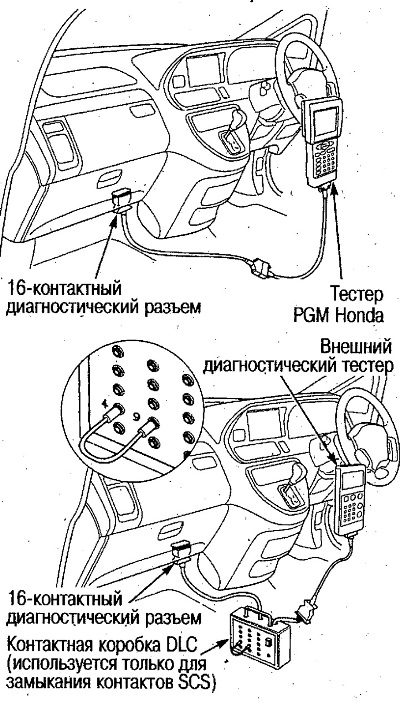
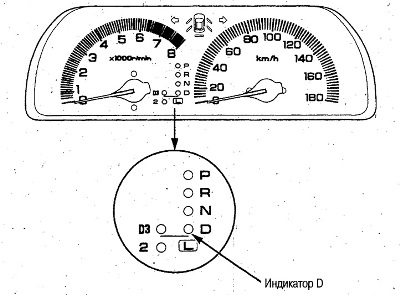
The PGM-Fi control unit (which combines PGM-Fi control and automatic transmission control) has a self-diagnosis function. If a malfunction is detected in the system (ignition key in the ON (II) position), the D indicator on the instrument panel flashes at certain intervals to indicate a malfunction. If using the DLC contact box, connect it to the 16-pin diagnostic connector located on the left side of the center console. Short the SCS contacts. The D indicator will start flashing, the number of flashes indicates the malfunction code (DTC). In addition, diagnostics can be performed using the Honda PGM tester or an external diagnostic tester (they should also be connected to the diagnostic connector). Before performing diagnostics, erase the malfunction codes from the control unit memory using the tester connected to the diagnostic connector.

If the data is not stored in the PGM-Fi unit's memory, it is possible that the unit's backup power supply system is faulty. Check the following components:
  • Fuse No.54 (40A) in the relay box.
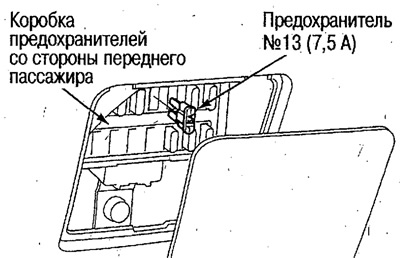
  • Fuse #13 (7.5A) in the fuse box on the front passenger side.
  • White/red wire between fuse #13 (7.5A) in the front passenger side fuse box and terminal #21 of the 25-pin connector B of the PGM-Fi unit.
White/red wire between fuse #13 (7.5A) in the…


White/red wire between fuse #13 (7.5A) in the…


1. Connect the DLC box to the 16-pin diagnostic connector and short the SCS terminal. Read the trouble code by the flashing of the D indicator. If using the Honda PGM tester or an external diagnostic tester: connect the tester to the diagnostic connector and read the trouble code.


Before connecting the Honda PGM Tester or external diagnostic tester, please refer to its owner's manual.

2. Check the reliability of the contact between the PGM-Fi unit connectors and the components that are "suspected" of malfunction.

If the connectors are not tightly connected, the indicator may give incorrect information.

3. Identify the fault by code.

To carry out diagnostics, you can use a regular digital tester with probes.
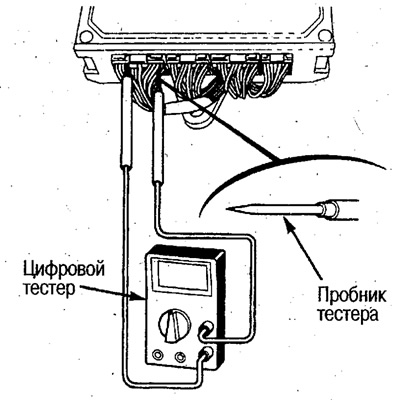
To carry out diagnostics, you can use a regular…


D indicator flashing


When the tester is not connected to the diagnostic connector, the indicator flashes at equal intervals (upper part of the figure).

When the tester is connected to the diagnostic connector and the SCS contacts are shorted, the indicator flashes as shown in the lower part of the figure.
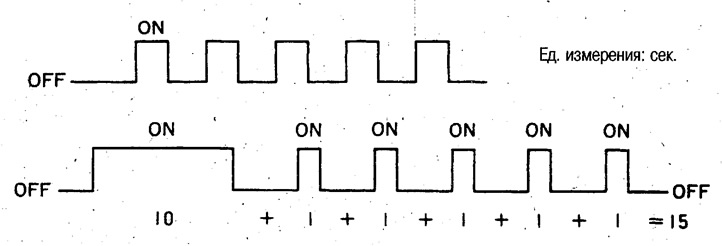
When the tester is connected to the diagnostic…


4. After completing the diagnostics, disconnect the tester or box from the diagnostic connector.


5. Clear the PGM-Fi control unit memory by removing the #13 clock fuse (7.5A) in the front passenger side fuse box for at least 10 seconds.

You can also clear the PGM-Fi unit memory using the Honda PGM tester when it is connected to the diagnostic connector.

Clearing the memory will also reset the clock and erase the fixed radio frequencies. Write down all necessary information before removing the fuse.

6. Set the clock and tune the radio frequencies.

7. If the fault cannot be found after performing the above procedures, perform a hydraulic system check (see the relevant section below).
7. If the fault cannot be found after performing…


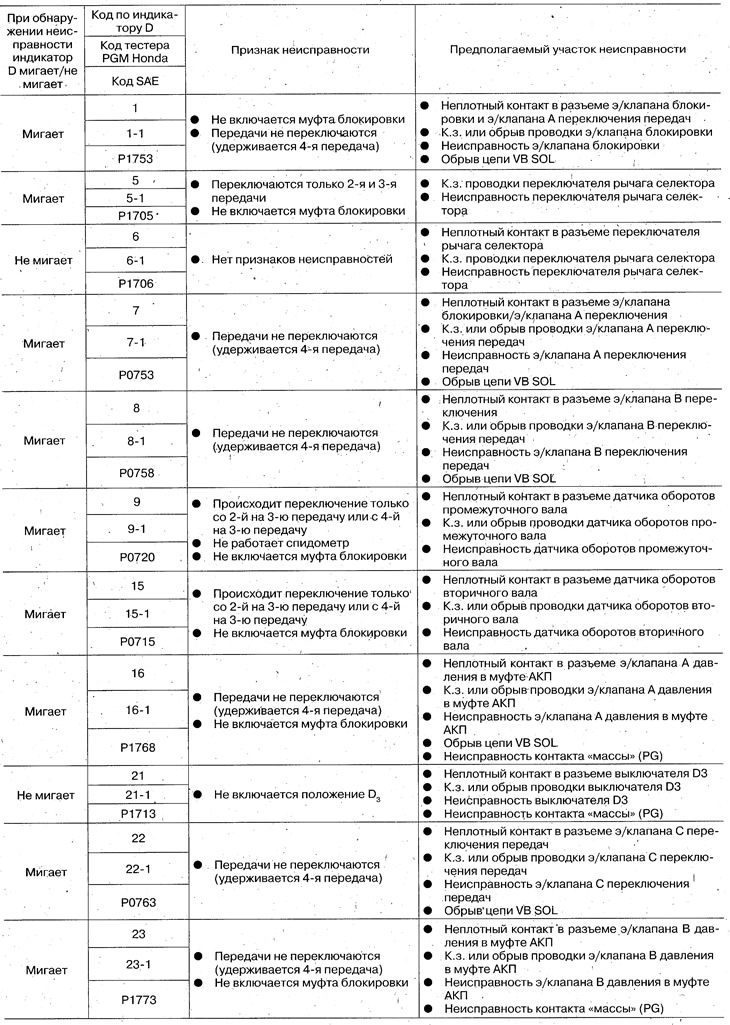
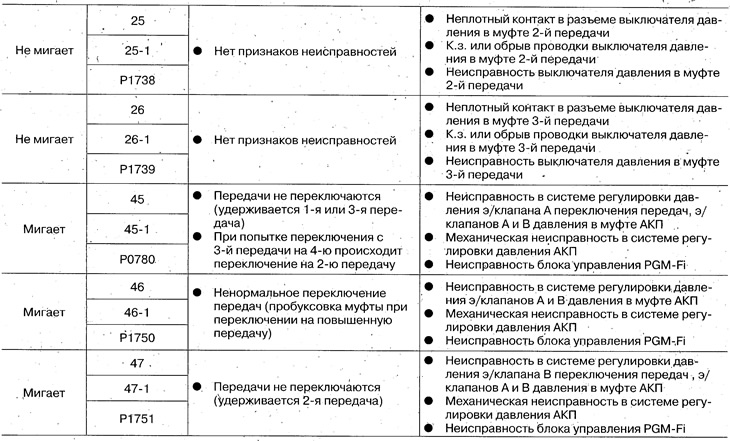
Error codes


Error codes
Error codes
This article is available at: russian, bulgarian, belarusian, ukrainian, serbian, croatian, romanian, polish, slovak, hungarian
This information has been verified: Emil Safonov
Share with friends:
◀ Previous
Avancier 1: Automatic gearbox
Next ▶

Component arrangement
PGM-FI Control Unit Pin Locations
Electrical diagram
Torque Converter Lockup Solenoid Valve and Shift Solenoid Valve Assy — Check
Torque Converter Lockup Solenoid Valve and Shift Solenoid Valve Assembly —…
Shift Solenoid Valves B and C — Check
Electric valves B and C of gear shifting — replacement
Automatic transmission clutch pressure solenoid valves A and B — checking
See also other articles from Honda manuals:
Electronic ignition — description and diagnostics Honda Accord 3 (1985-1989)
Carburetor diagnostics and repair — general information Honda Civic 3 and 4 (1983-1991)
Diagnostic system Honda Fit 1 (2001-2008)
Electrical equipment failures Honda CR-V 2 (2002-2006, petrol)
Electrical connections of the injection and control system Honda HR-V 1 (1998-2006, petrol)
Link in different formats to this article
Comments and feedback from visitors
No comments yet


How much will 49 + 32 ?


Avancier 1 (1999-2003, petrol) 
  • General information
  • Controls and instruments
  • User manual
  • Power unit
  • Engine maintenance
  • Engine repair
  • Cooling system
  • Engine management
  • Power and exhaust system
  • Transmission
  • Automatic gearbox
  • Drive shafts and differential
  • Chassis and running gear
  • Steering
  • Car suspension
  • Brake system
  • Body and interior
  • Doors, locks and windows
  • Interior (internal elements)
  • Exterior (external elements)
  • Air conditioner
  • Electrical equipment
  • Power devices
  • Equipment and devices
  • Headlights and lighting
  • Electrical circuits
HondaBook.ru © 2018–2026 • Mobile version • Sitemap: EN BG BY UA RS HR RO PL SK HU • Feedback • Driver Information • Search system • Bookmark
Accord 3 (1985-1989) • Accord 6 (1997-2002) • Civic 3 and 4 (1983-1991) • Civic 5 and 6 (1991-2000) • Civic 6 (1995-2000) • Civic 7 (2000-2005) • Civic 8 (2005-2011) • Fit 1 (2001-2008) • CR-V 1 (1995-2001) • CR-V 2 (2002-2006) • HR-V 1 (1998-2006) • Avancier 1 (1999-2003) •
 
This website uses cookies to ensure proper functioning. By clicking "OK," you agree.