
Contents: Testing the Windscreen Washer/Wiper…⇊ Testing the input of the…⇊ Testing the Windshield Wiper Motor ⇊ Windshield Wiper Motor Replacement ⇊ Testing the rear window wiper motor ⇊ Rear Window Wiper Motor Replacement ⇊ Testing the windshield/rear window…⇊
Note: Left hand drive model shown; the layout on the right-hand drive model is similar.
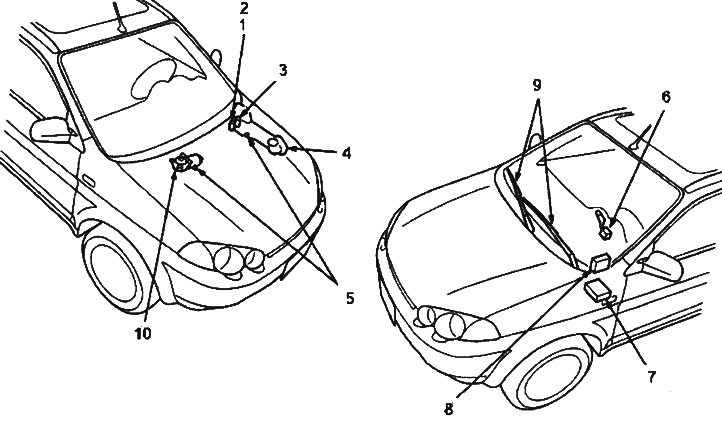
1. REAR WINDOW WASHER MOTOR
2. WINDSHIELD WASHER PIPE REAR WASHER PIPE
3. WINDSHIELD WASHER MOTOR
4. WASHER RESERVOIR
5. WINDSHIELD WASHER SPRAY
6. WINDSHIELD/REAR WINDOW WASHER/WIPER SWITCH
7. INTERMITTENT CLEANER RELAY CIRCUIT
8. REAR WINDOW WIPER INTERMITTENT CONTROL UNIT (KG AND KE MODELS)
9. WINDSHIELD WIPER LEVERS AND LEVERAGE
10. WINDSHIELD WIPER MOTOR
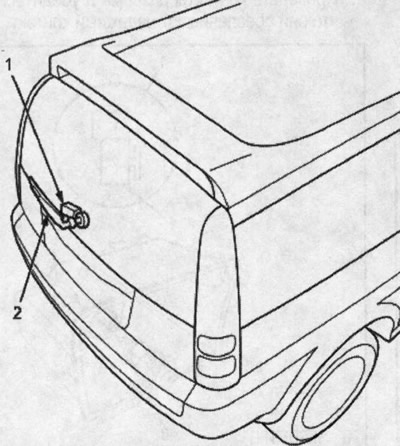
1. Rear window wiper motor
2. Rear window wiper levers and linkage
Testing the Windscreen Washer/Wiper Switch
1. Remove the covers from the steering column.
2. Disconnect the 14-pin connector from the windshield washer/wiper switch, then remove the two screws and switch.
3. Check for conductivity between the contacts in all switch positions in accordance with the table.
- If there is conductivity, the switch is OK.
- If there is no continuity, check for continuity between the switch harnesses.
- If the switch harness is OK, replace the windshield washer/wiper switch.
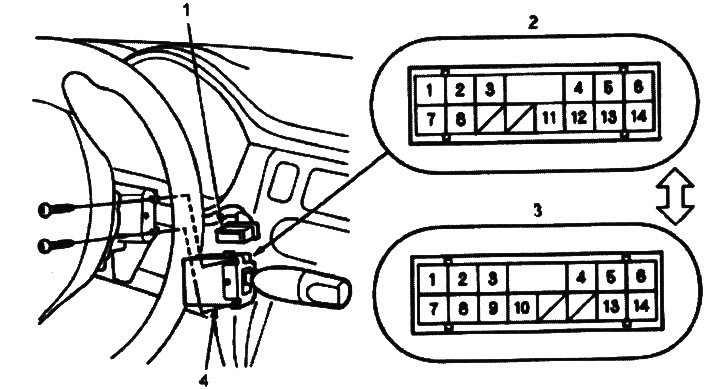
1. 14-PIN CONNECTOR
2. Models KG, KY, KE
3. Models KN, KG, KQ, KU
4. WINDSHIELD WASHER/WIPER SWITCH
Windshield Washer/Wiper Switch:
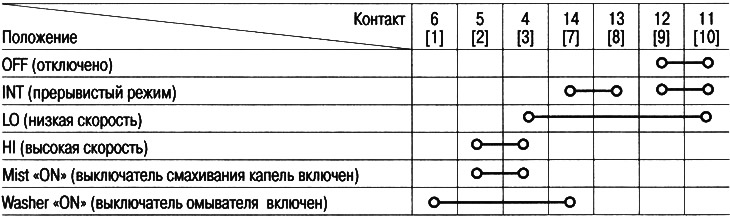
[]: Models KN, KT, KQ, KU
Rear Window Washer/Wiper Switch:
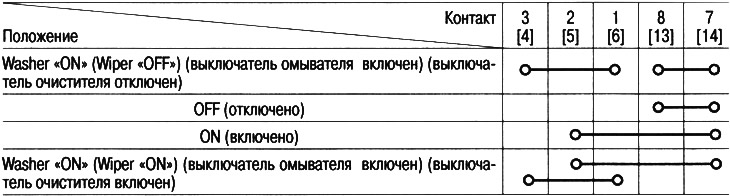
[]: Models KN, KT, KQ, KU
Testing the input of the intermittent rear window wiper control unit (models KG and KE)
1. Remove the lower pocket on the driver's side.
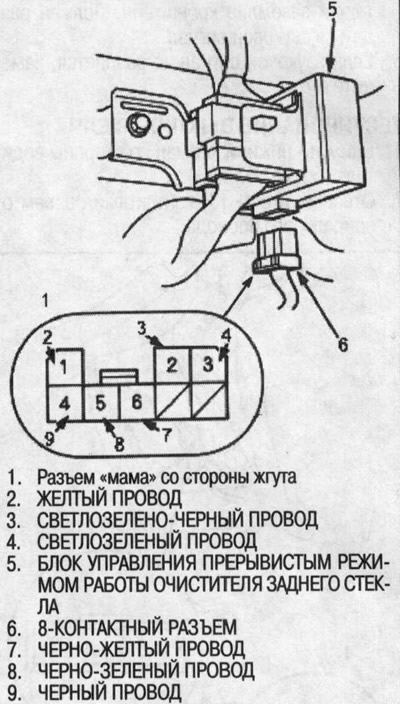
2. Disconnect the 8-pin connector from the control unit.
3. Check the connector and socket contacts to ensure they are making good contact.
- If contacts are bent, loose or corroded, repair the defects and retest the system.
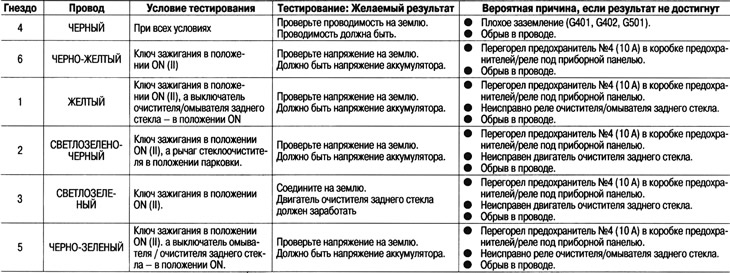
- If the contacts appear to be OK, perform the following tests on the connector (table on next page, top).
- If any of the tests indicate a problem, find and correct the cause, then retest the system.
- If the test at the input of the unit shows normal, the control unit must be faulty, replace it.
Testing the Windshield Wiper Motor
1. Open the hood.
2. Disconnect the 5-pin connector from the windshield wiper motor.
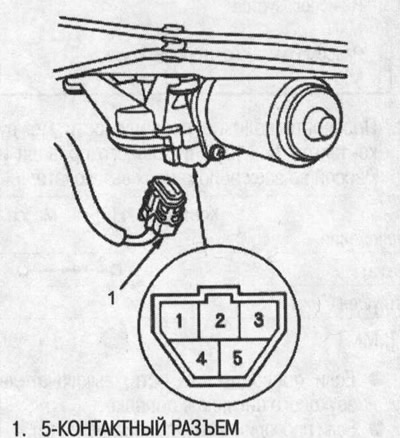
3. Check the engine operation by supplying battery power and grounding according to the table.
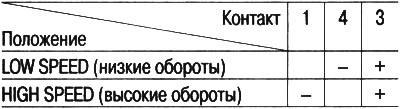
If the motor does not run or rotates roughly, replace it.
4. Connect an analog voltmeter between terminals #5 (+) and #3 (-) and run the engine at low or high speed.
The voltmeter should alternately show 0 V and 4 V or less.
Windshield Wiper Motor Replacement
1. Open the hood, unscrew the cap nuts and remove the windshield wiper arms.
Note: Remove the wiper arms carefully to avoid scratching the hood.
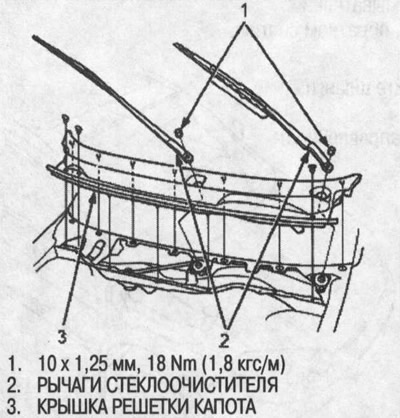
2. Remove the hood seal and hood grille cover.
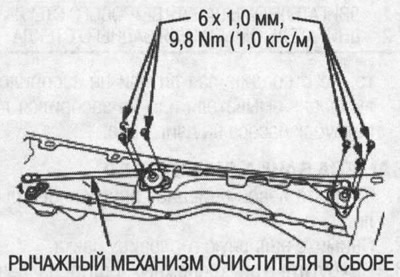
3. Loosen the bolts and remove the wiper arm assembly.
4. Remove the four mounting nuts, then disconnect the 5-pin connector from the windshield wiper motor.
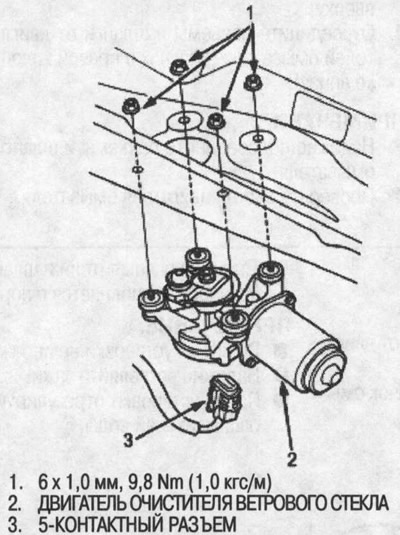
5. Remove the rod from the windshield wiper motor.
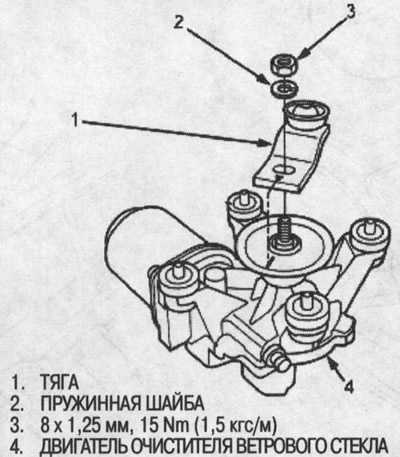
Note: Mark the original adjustment by scribing a line on the windshield wiper linkage and linkage.
6. Installation is performed in the reverse order of removal. Apply grease to moving parts. Replace damaged clamps if necessary. Check the operation of the wiper motor.
Testing the rear window wiper motor
1. Remove the decorative panel from the rear door.
2. Disconnect the 4-pin connector from the wiper motor assembly.
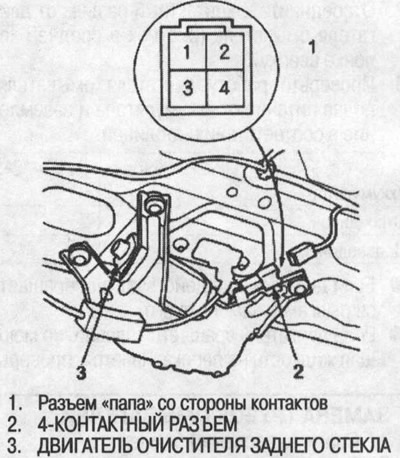
3. Check the operation of the motor by applying battery power to terminal #1 and ground to terminal #3. If the motor does not operate or rotates erratically, replace it.
4. Connect the 4-pin connector to the wiper motor.
5. Connect an analog voltmeter between terminals #4 (+) and #2 (-).
6. Start the engine by turning the windshield wiper switch to the ON position. The voltmeter should alternately show 0 V and 4 V or less.
Rear Window Wiper Motor Replacement
1. Remove the decorative panel from the rear door.
2. Remove the rear window wiper arm.
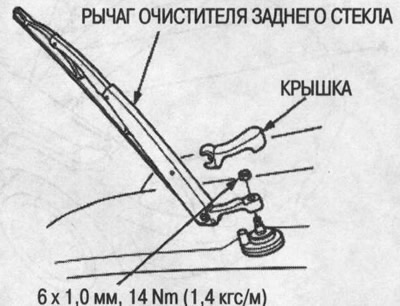
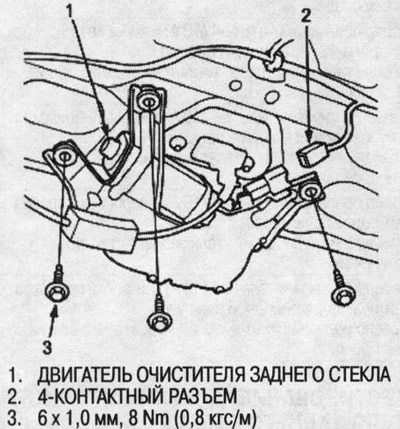
3. Disconnect the 4-pin connector from the engine.
4. Remove the three mounting bolts from the rear door.
Testing the windshield/rear window washer motor
1. Remove the left front inner fender.
2. Disconnect the 2-pin connector from the washer motor.
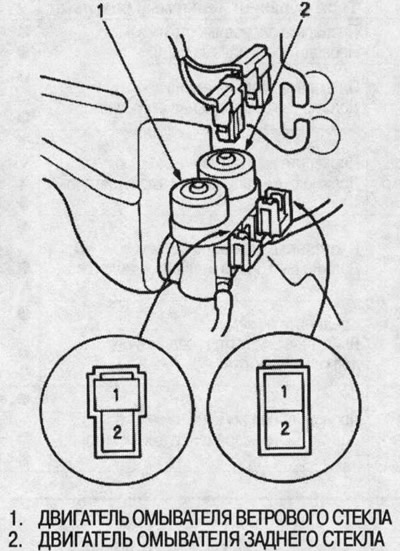
3. Check the operation of the washer motor by supplying power from the battery and grounding according to the table.
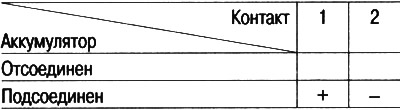
- If the motor does not operate or rotates roughly, replace it.
- If the engine turns over smoothly but washer fluid is not pumped, check to see if the washer hose is disconnected or clogged or if the pump outlet on the engine is clogged.
(The text of the article is available on the website: HONDABOOK.ru)