
HondaBook.ru
Auto companies Volkswagen Auto companies Ford Auto companies Lada Auto companies Skoda Auto companies BMW Auto companies Mazda Auto companies Peugeot
English Русский
Български
Беларускі
Український
Српски
Hrvatski
Română
Polski
Slovenský
Magyar
Bookmark Contacts Sitemap   


Accord Civic Fit / Jazz CR-V HR-V Others Articles
Fit 1 (2001-2008)

Vacuuming, charging and checking the system (Honda Fit 1)

  • Main
  • Honda Fit
  • 1 (2001-2008)
  • Body and interior
  • Heater and air conditioner
  • Vacuuming, charging and checking the system
0
Contents: Vacuuming the system ⇊ Charging the system with refrigerant ⇊ Checking the tightness of the system ⇊
Attention:
  • If a refrigerant leak occurs, ventilate the room before recharging the system.
  • Additional information on safe handling of refrigerant and compressor oil can be obtained from the instructions for use.
  • When replacing some components of the air conditioning system, it is necessary to add compressor oil (SP-10) to the system.
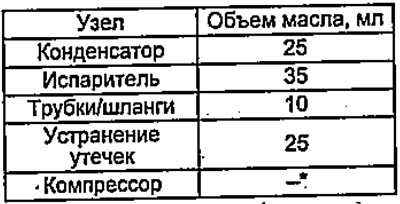

When replacing some components of the air…

* (right-hand drive models): the amount of compressor oil in the installed compressor must match the amount of oil in the removed one (the new compressor contains approximately 50 ml of compressor oil).

Vacuuming the system


1. If the air conditioning system has been depressurized for any reason, it must be evacuated using a refrigerant filling station. If the system has been depressurized for several days, the condenser dryer must be replaced and evacuated.

2. Connect the refrigerant charging station (1) to the high pressure valve (2) and low pressure valve (3) as shown in the figure. Evacuate the system.
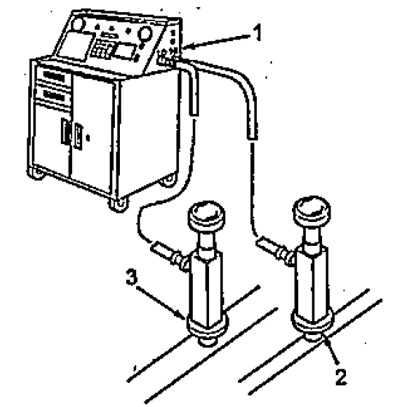
2. Connect the refrigerant charging station (1)…


3. If the pressure in the low pressure valve does not reach 93.5 kPa within fifteen minutes, there is probably a leak in the system. Partially charge the system with refrigerant and check for leaks (see "Testing the system for leaks").


Charging the system with refrigerant


1. Connect the refrigerant charging station to the high pressure valve and low pressure valve.

2. Evacuate the system (see "Evacuating the system").

3. Add the same amount of compressor oil that was removed from the system.

4. Charge the system with the appropriate amount of R-134a refrigerant. Do not overcharge the refrigerant, as this may damage the compressor.
  • The amount of refrigerant is 400 - 450 g.

5. Check for leaks (see "Checking the system for leaks").

6. Check the system performance.

Checking the tightness of the system


1. Check the system using a leak detector.

2. If leaks are detected, it is necessary to repair or replace parts at the leak sites (hoses or clamps).

3. After checking and eliminating leaks, the system must be evacuated.

(The original is located on the website: «HondaBook»)
This article is available at: russian, bulgarian, belarusian, ukrainian, serbian, croatian, romanian, polish, slovak, hungarian
This information has been verified: Varvara Vereshchagina
Share with friends:
◀ Previous
Fit 1: Heater and air conditioner
Next ▶

Checking the Heater Fan Motor Circuit (Right Hand Drive Models)
Location of heating system components
Safety precautions when working with refrigerant
Checking the Heater Fan Motor Circuit (Left Hand Drive Models)
Tightening torques for threaded connections of the air conditioning system
Checking the Condenser Fan Circuit (Right Hand Drive Models)
Checking the Condenser Fan Circuit (Left Hand Drive Models)
Checking the common circuit of the radiator and condenser fans
See also other articles from Honda manuals:
Checking the status of the charging system Honda Accord 6 (1997-2002)
Checking the status of the charging system Honda Civic 6 (1995-2000)
Cooling system — checking and replacing fluid Honda CR-V 1 (1995-2001, petrol)
Checking the charging system with a test lamp Honda HR-V 1 (1998-2006, petrol)
Checking the crankcase ventilation system Honda Avancier 1 (1999-2003, petrol)
Link in different formats to this article
Comments and feedback from visitors
No comments yet


How much will 33 + 14 ?


Fit 1 (2001-2008) 
  • General information
  • User manual
  • Maintenance
  • Power unit
  • Engine repair
  • Cooling and lubrication system
  • Injection and power system
  • Control system
  • Engine electrical equipment
  • Transmission
  • Clutch
  • Mechanical gearbox
  • Automatic gearbox
  • Variator (CVT)
  • Drive shafts and gearbox
  • Chassis and running gear
  • Car suspension
  • Steering
  • Brake system
  • Body and interior
  • Exterior (external elements)
  • Interior (internal elements)
  • Doors, locks and windows
  • Heater and air conditioner
  • Safety system
  • Electrical equipment
  • Equipment and devices
  • Wiring diagrams (since 06.2001)
  • Wiring diagrams (since 06.2004)
HondaBook.ru © 2018–2026 • Mobile version • Sitemap: EN BG BY UA RS HR RO PL SK HU • Feedback • Driver Information • Search system • Bookmark
Accord 3 (1985-1989) • Accord 6 (1997-2002) • Civic 3 and 4 (1983-1991) • Civic 5 and 6 (1991-2000) • Civic 6 (1995-2000) • Civic 7 (2000-2005) • Civic 8 (2005-2011) • Fit 1 (2001-2008) • CR-V 1 (1995-2001) • CR-V 2 (2002-2006) • HR-V 1 (1998-2006) • Avancier 1 (1999-2003) •
 
This website uses cookies to ensure proper functioning. By clicking "OK," you agree.