Contents: Troubleshooting Sequence ⇊ Clearing fault codes ⇊ System recovery after diagnostics…⇊ Notes on Troubleshooting ⇊ Fault codes identified by flashing…⇊ Diagnostic Trouble Codes ⇊ Diagnostics of malfunctions by signs ⇊
Troubleshooting Sequence
When the PGM-FI warning light comes on or you want to diagnose the malfunction of various components, start the diagnosis after checking the PGM-FI warning light, then clear the DTCs (Diagnostic Trouble Codes) and repair the malfunctioning component after completing the diagnosis.
Checking the PGM-FI warning light
When not using the HONDA PGM tester or other diagnostic tool
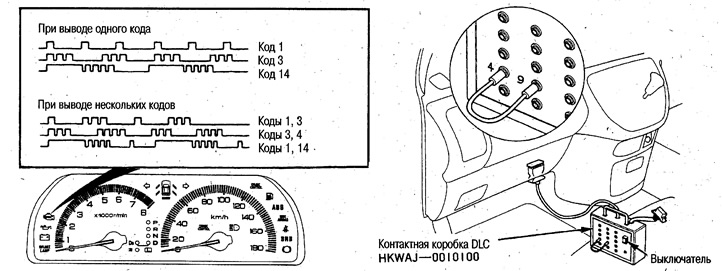
Connect the DLC terminal box to the 16-pin diagnostic connector located on the left side of the center console, short-circuit pins No.4 and 9 of the DLC terminal box and press the switch. When the PGM-FI indicator lamp starts to flash, count the number of flashes. The indicator lamp flashes repeatedly. Each long flash corresponds to the tens digit of the code number, and each short flash corresponds to the units digit of the code number. A diagnostic tool can also be connected to the terminal box.
When using the HONDA PGM tester or other diagnostic tool
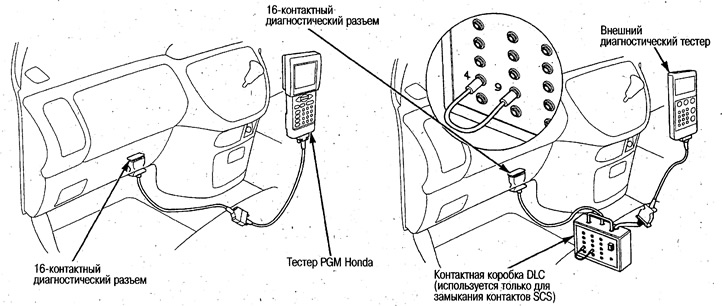
1. Connect the Honda PGM Tester or other diagnostic tool to the 16-pin diagnostic connector located on the left side of the center console.
2. Turn the ignition key to the ON (II) position.
3. Read the diagnostic trouble codes (DTC) and freeze frame data displayed on the Honda PGM tester or diagnostic tool and use the table to determine the faulty component (see below).
- Before connecting the Honda PGM Tester or other diagnostic tool, refer to the description for the appropriate tool.
- Since the Honda PGM tester can detect Freezing data, make a screen copy and other various control unit data, select the mode that matches the test purpose before performing diagnostics.
Clearing fault codes
Clearing fault codes is accomplished using the Honda PGM Tester or other diagnostic tool connected to the 16-pin diagnostic connector located on the left side of the center console.
1. Turn the ignition key to the OFF position.
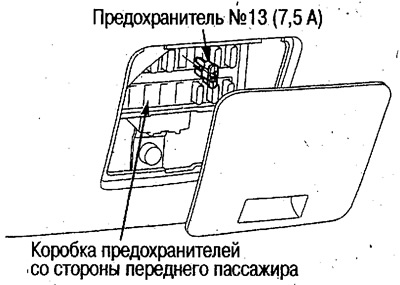
2. Reset the control unit memory by removing fuse No.13 (7.5A) from the fuse box on the front passenger side for at least 10 seconds.
During the reset, the clock readings are reset and the frequencies of fixed radio stations are erased at the same time.
System recovery after diagnostics are completed
1. Disconnect the DLC, Honda PGM Tester, or other diagnostic tool from the 16-pin diagnostic connector.
If the SCS contacts of the diagnostic connector are left shorted, the PGM-FI warning lamp will remain illuminated continuously.
2. Reset the control unit memory.
3. Set the clock and restore the radio station frequencies.
Notes on Troubleshooting
The PGM-FI indicator lamp may light up or flash if the connectors are not connected properly, so if the fault location is not identified after performing diagnostics, check the reliability of the connection of all 4 control unit connectors and the connector of the suspected faulty component (clean and repair if necessary). If the fault cannot be identified after following the above recommendations, perform a check in accordance with the diagnostic table for signs of faults (see below).
- The PGM-FI indicator lamp lights up when a malfunction is detected. The control unit stores the malfunction information in its memory even after the ignition key is turned to the OFF position, so the indicator lamp goes out after the ignition key is turned to the OFF position, and lights up again after the ignition key is turned to the ON (II) position.
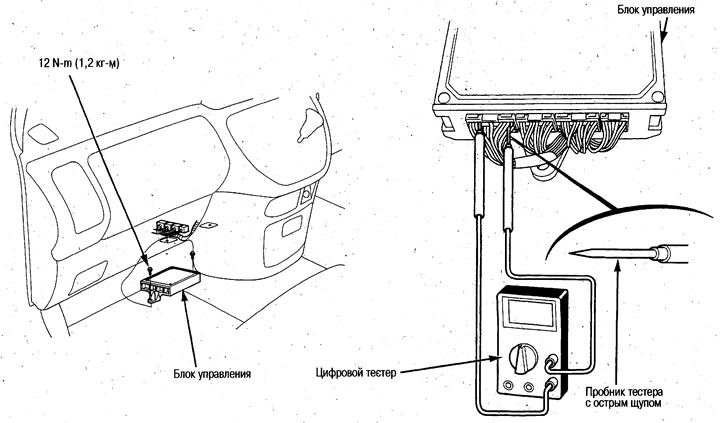
- A digital tester is used to diagnose faults. To check the 4 connectors of the control unit, it is necessary to unscrew the mounting bolts of the control unit.
- If you disconnect the 32-pin, 25-pin, 31-pin or 16-pin control unit connector and turn the ignition switch to the ON (II) position during troubleshooting, the PGM-FI indicator lamp may come on, so clear the trouble codes (see above).
- Due to the fact that the automatic transmission system and sensors are used together/during diagnosis with the control unit connectors disconnected, the D indicator may come on. In this case, after completing the PGM-FI system check, erase the control unit memory (see above) and make sure that the D indicator goes out.
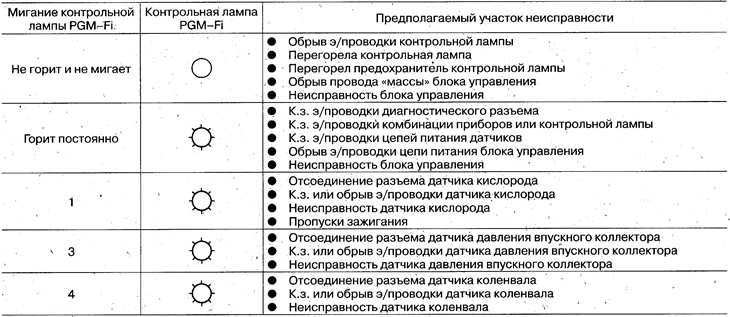
Fault codes identified by flashing PGM-FI indicator light
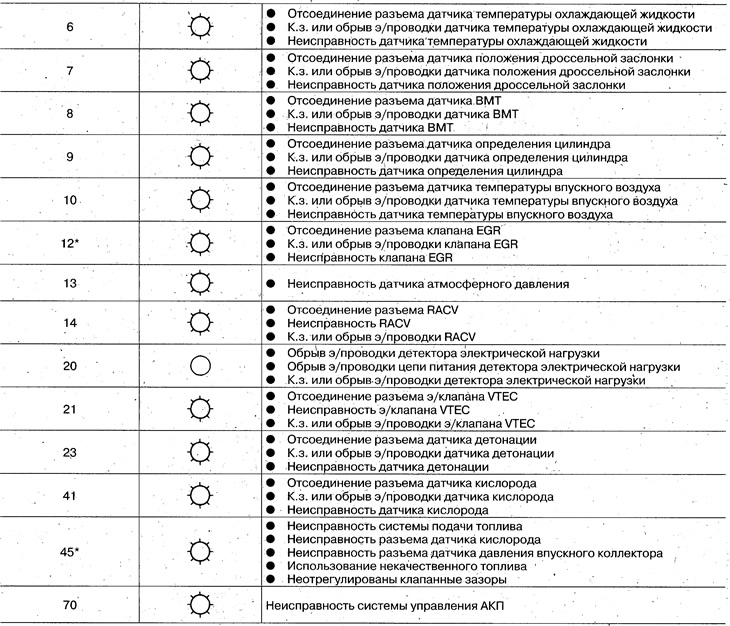
*: 2 faults are displayed in sequence
- Each long flash corresponds to the tens digit of the code number.
- If the number of flashes does not correspond to the table or the lamp is constantly on, then the control unit is faulty.
- Sometimes the PGM-FI indicator light and the D indicator light come on at the same time. In this case, perform the PGM-FI control system troubleshooting, and then check again whether the D indicator lights up.
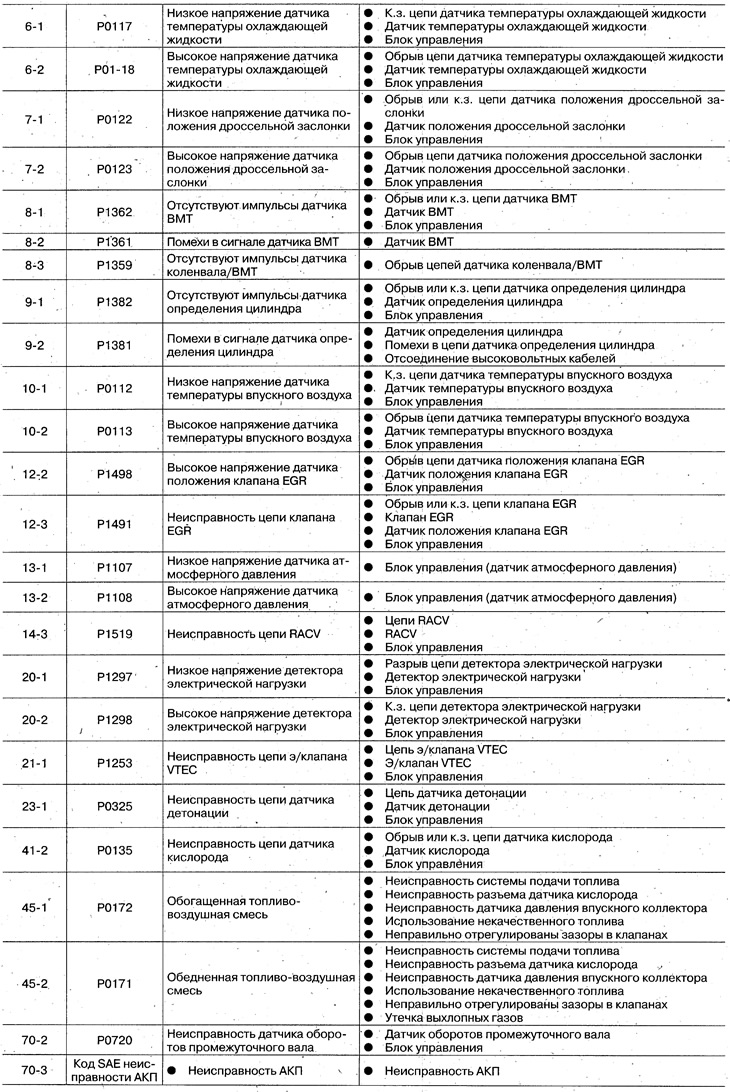
Diagnostic Trouble Codes
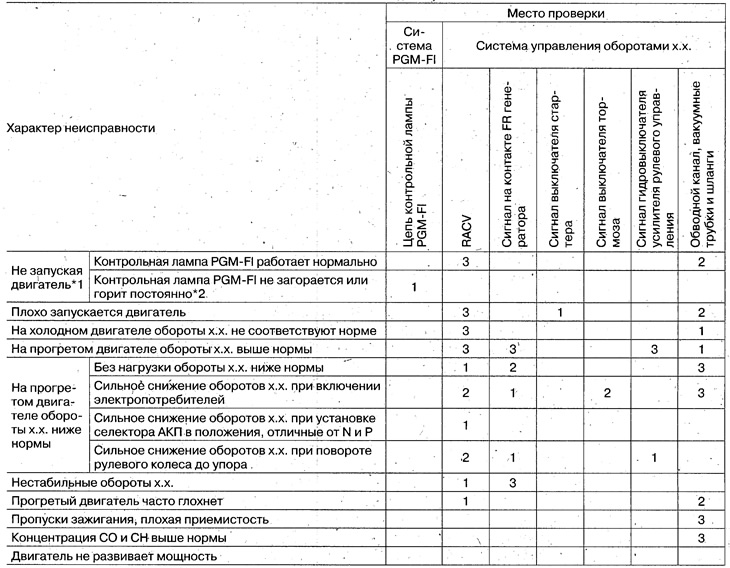
Diagnostics of malfunctions by signs
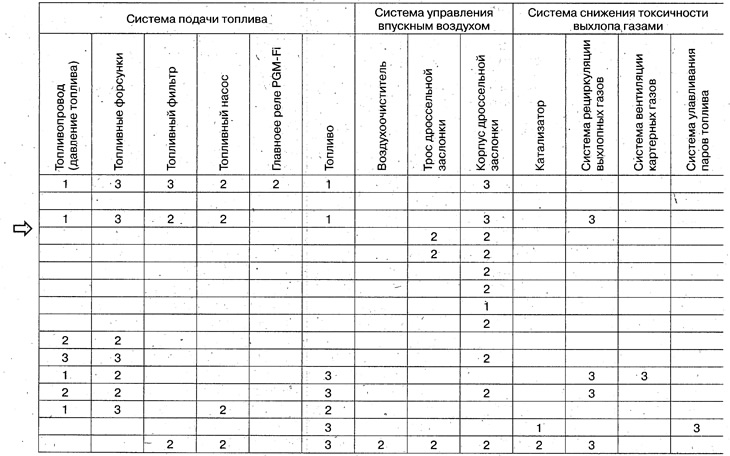
If any of the engine problems listed below occur, perform the checks listed on the right side of the table in numerical order.
*1: If the starter does not work normally, check the battery and starter.
*2: If diagnostic trouble codes are stored in the control unit memory, refer to the Diagnostic Trouble Codes section.