
HondaBook.ru
Auto companies Volkswagen Auto companies Ford Auto companies Lada Auto companies Skoda Auto companies BMW Auto companies Mazda Auto companies Peugeot
English Русский
Български
Беларускі
Український
Српски
Hrvatski
Română
Polski
Slovenský
Magyar
Bookmark Contacts Sitemap   


Accord Civic Fit / Jazz CR-V HR-V Others Articles
Avancier 1 (1999-2003, petrol)

Removal and installation the windshield (Honda Avancier 1)

  • Main
  • Honda
  • Avancier 1 (1999-2003, petrol)
  • Body and interior
  • Doors, locks and windows
  • Removal and installation the windshield
0
Contents: Removable components ⇊ Removal and installation side…⇊ Method of installing piano wire ⇊ Places of installation of rubber…⇊ Installing the top molding ⇊ Installing fasteners on the…⇊
For information on the procedure for removing and installing the glass, see the section "Procedure for removing and installing the windshield" above.

Removable components


Before removing the glass, remove the following components.

Interior rearview mirror (see above).

The top hood cover (see below).

Front windscreen wiper arms (see chapter Electrical equipment).

Removal and installation side moldings/removing holders


When removing the holders, heat them with a hair dryer (approx. 110-120°C), soften the double-sided tape and remove it with nippers.

Avoid scratching the body.

Do not overheat the bonding areas on the body, as this may change the color of the paint.

To protect plastic components from deformation, protect them from hot air with aluminum foil.
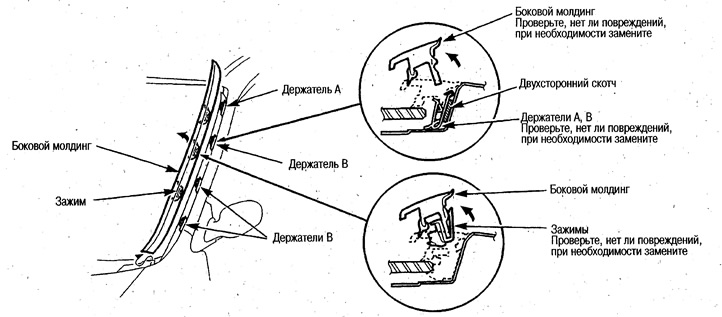
To protect plastic components from deformation,…


Method of installing piano wire


Pass piano wire through each corner as shown in the picture, pull the wire in the directions of the arrows and cut the glue.


The figure shows the view from the outside.
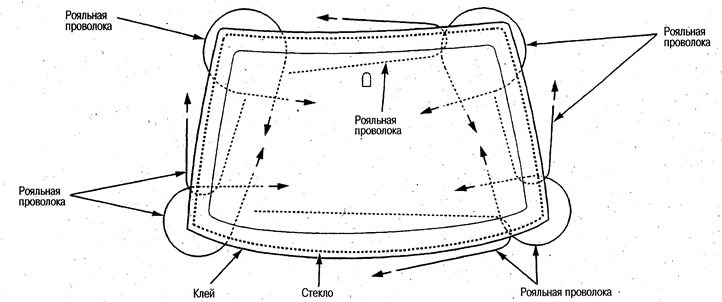
The figure shows the view from the outside.


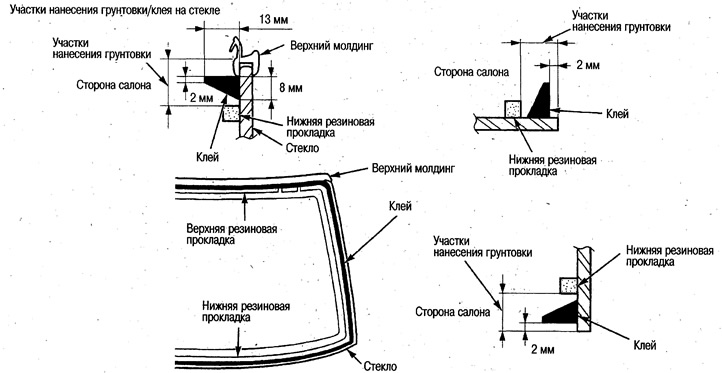
Places of installation of rubber gaskets and fasteners/places of application of primer


The installation of rubber gaskets and fasteners is carried out according to the alignment marks on the glass.

A primer of ЗМ N-200 or equivalent is applied to the place where the molding is installed.
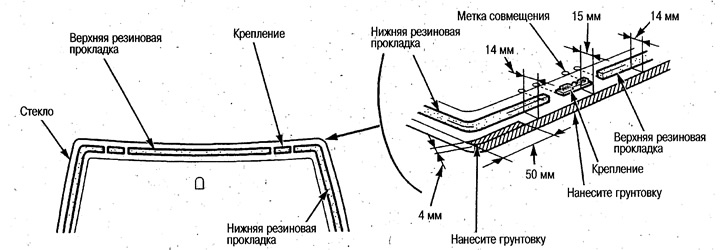
A primer of ЗМ N-200 or equivalent is applied to…


Installing the top molding


Apply glue to both ends of the top molding as shown in the picture, install on the glass according to the dimensions shown in the picture and press.

Align the molding and glass center marks and press the molding into place.

After installing the molding, install a new molding seal.
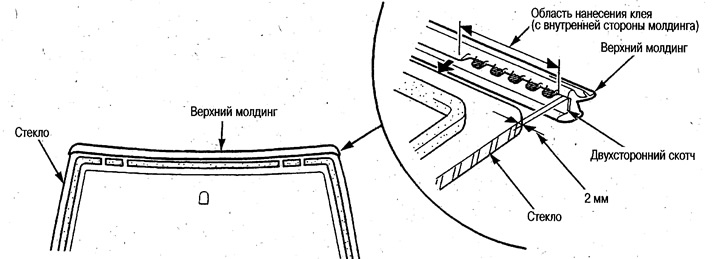
After installing the molding, install a new…


Installing fasteners on the body/installing holders/applying primer to the body


Before installing the holders, clean the contact surfaces of the body with clean gasoline or alcohol, remove the paper from the double-sided tape of the holder and install the holder on the body, aligning it with the recesses. After installing the holder, apply glue (two-component epoxy glue) to its edges.
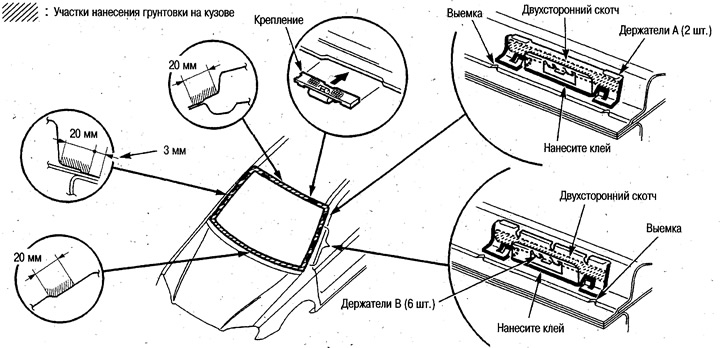
Before installing the holders, clean the contact…


Before installing the holders, clean the contact…


Based on materials from the website Hondabook.ru
This article is available at: russian, bulgarian, belarusian, ukrainian, serbian, croatian, romanian, polish, slovak, hungarian
This information has been verified: Emil Safonov
Share with friends:
◀ Previous
Avancier 1: Doors, locks and windows
Next ▶

Windshield removal and installation procedure
Glass Glue — General Information
Glasses — device
Removal and installation the interior rearview mirror
Removal and installation the mirror holder
Removal and installation rear door glass
Removal and installation the upper rear door glass
Removal and installation the rear fixed glass
See also other articles from Honda manuals:
Windshield wiper motor and its connections Honda Accord 3 (1985-1989)
Replacing windshield wiper blades Honda Civic 3 and 4 (1983-1991)
Windshield — Removal Honda Fit 1 (2001-2008)
Windshield and fixed glass — replacement Honda CR-V 1 (1995-2001, petrol)
Windshield replacement Honda HR-V 1 (1998-2006, petrol)
Link in different formats to this article
Comments and feedback from visitors
No comments yet


How much will 21 + 44 ?


Avancier 1 (1999-2003, petrol) 
  • General information
  • Controls and instruments
  • User manual
  • Power unit
  • Engine maintenance
  • Engine repair
  • Cooling system
  • Engine management
  • Power and exhaust system
  • Transmission
  • Automatic gearbox
  • Drive shafts and differential
  • Chassis and running gear
  • Steering
  • Car suspension
  • Brake system
  • Body and interior
  • Doors, locks and windows
  • Interior (internal elements)
  • Exterior (external elements)
  • Air conditioner
  • Electrical equipment
  • Power devices
  • Equipment and devices
  • Headlights and lighting
  • Electrical circuits
HondaBook.ru © 2018–2026 • Mobile version • Sitemap: EN BG BY UA RS HR RO PL SK HU • Feedback • Driver Information • Search system • Bookmark
Accord 3 (1985-1989) • Accord 6 (1997-2002) • Civic 3 and 4 (1983-1991) • Civic 5 and 6 (1991-2000) • Civic 6 (1995-2000) • Civic 7 (2000-2005) • Civic 8 (2005-2011) • Fit 1 (2001-2008) • CR-V 1 (1995-2001) • CR-V 2 (2002-2006) • HR-V 1 (1998-2006) • Avancier 1 (1999-2003) •
 
This website uses cookies to ensure proper functioning. By clicking "OK," you agree.