
HondaBook.ru
Auto companies Volkswagen Auto companies Ford Auto companies Lada Auto companies Skoda Auto companies BMW Auto companies Mazda Auto companies Peugeot
English Русский
Български
Беларускі
Український
Српски
Hrvatski
Română
Polski
Slovenský
Magyar
Bookmark Contacts Sitemap   


Accord Civic Fit / Jazz CR-V HR-V Others Articles
HR-V 1 (1998-2006, petrol)

Rectifier Removal (Mitsubishi) (Honda HR-V 1)

  • Main
  • Honda HR-V
  • 1 (1998-2006, petrol)
  • Power unit
  • Engine electrical equipment
  • Rectifier Removal (Mitsubishi)
0
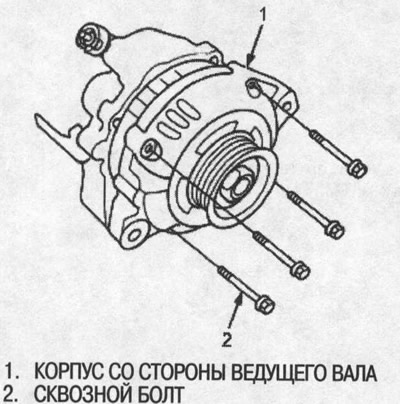
1. Remove the four through bolts.

1. Remove the four through bolts.


2. Heat the rear bearing seat with a 1000W hair dryer for about five minutes (50-60°C).
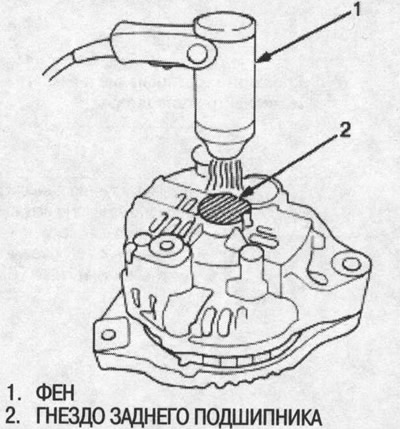
2. Heat the rear bearing seat with a 1000W hair…


3. Separate the rear housing from the housing on the drive shaft side by inserting a flat-bladed screwdriver into the gaps and prying them up.

Note: Do not damage the stator with the tip of the screwdriver.
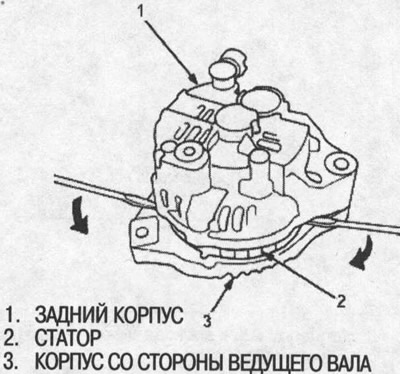

Note: Do not damage the stator with the tip of…


4. Separate the rear housing from the housing on the drive shaft side.


Note: Separate the rear housing and the drive shaft side housing so that the stator remains with the rear housing.
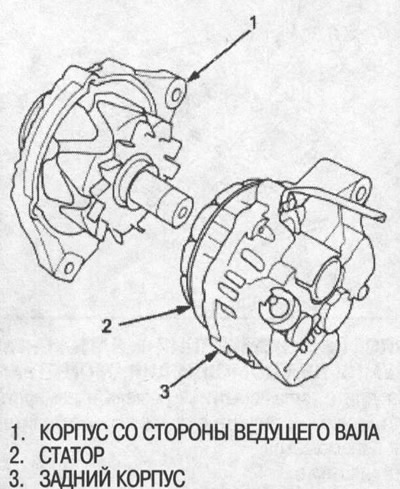

Note: Separate the rear housing and the drive…


5. Separate the rear housing from the stator/rectifier assembly by removing the four screws and terminal nut.
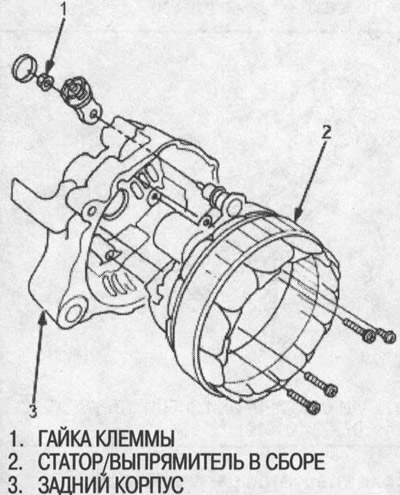
5. Separate the rear housing from the…


6. Unsolder the rectifier from the stator terminals.
  • To avoid damaging the diodes with heat, clamp the stator terminals with heat-dissipating pliers and use only a soldering iron with a long tip.
  • The soldering iron power should be 100 W.
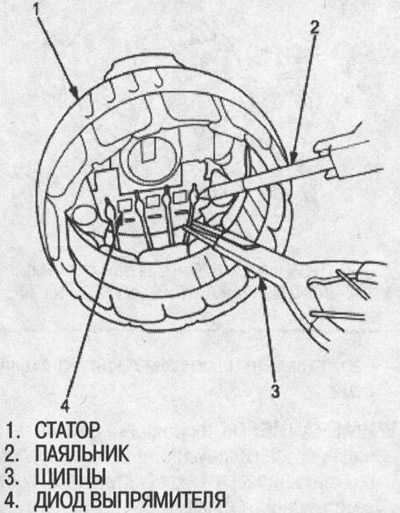
The soldering iron power should be 100 W.


7. Installing a new rectifier is performed in the reverse order of removal.
  • To avoid damaging the diodes with heat and to ensure a high-quality connection, use a soldering iron with a long tip only.
  • Use only wire solder, otherwise the soldered joints will rust.
This article is available at: russian, bulgarian, belarusian, ukrainian, serbian, croatian, romanian, polish, slovak, hungarian
This information has been verified: Emil Safonov
Share with friends:
◀ Previous
HR-V 1: Engine electrical equipment
Next ▶

Generator/regulator testing
Testing the Generator Control System (KG, KE, KQ and KU Models)
Checking the charging system with a test lamp
Generator repair (Mitsubishi)
Generator repair (Denso)
Checking the Generator Brushes (Denso)
Checking the Generator Brushes (Mitsubishi)
Testing of generator rotor slip rings
Testing the generator stator
Replacing the rear bearing (Mitsubishi)
See also other articles from Honda manuals:
Checking the generator rectifier Honda Avancier 1 (1999-2003, petrol)
Link in different formats to this article
Comments and feedback from visitors
No comments yet


How much will 41 + 13 ?


HR-V 1 (1998-2006, petrol) 
  • General information
  • User manual
  • Maintenance
  • Power unit
  • Engine repair
  • Lubrication system
  • Cooling system
  • Fuel injection and control
  • Power and exhaust system
  • Engine electrical equipment
  • Transmission
  • Clutch
  • Mechanical gearbox
  • Automatic gearbox
  • Rear differential
  • Drive shafts and cardan
  • Chassis and running gear
  • Steering
  • Car suspension
  • Brake system
  • Body and interior
  • Exterior (external elements)
  • Interior (internal elements)
  • Doors, locks and windows
  • Electrical equipment
  • Equipment and devices
  • Lighting system
  • Electrical circuits
HondaBook.ru © 2018–2026 • Mobile version • Sitemap: EN BG BY UA RS HR RO PL SK HU • Feedback • Driver Information • Search system • Bookmark
Accord 3 (1985-1989) • Accord 6 (1997-2002) • Civic 3 and 4 (1983-1991) • Civic 5 and 6 (1991-2000) • Civic 6 (1995-2000) • Civic 7 (2000-2005) • Civic 8 (2005-2011) • Fit 1 (2001-2008) • CR-V 1 (1995-2001) • CR-V 2 (2002-2006) • HR-V 1 (1998-2006) • Avancier 1 (1999-2003) •
 
This website uses cookies to ensure proper functioning. By clicking "OK," you agree.