HondaBook.ru
Auto companies Volkswagen Auto companies Ford Auto companies Lada Auto companies Skoda Auto companies BMW Auto companies Mazda Auto companies Peugeot
English Русский
Български
Беларускі
Український
Српски
Hrvatski
Română
Polski
Slovenský
Magyar
Bookmark Contacts Sitemap   


Accord Civic Fit / Jazz CR-V HR-V Others Articles
HR-V 1 (1998-2006, petrol)

Interior Lighting — Description and Testing (Honda HR-V 1)

  • Main
  • Honda HR-V
  • 1 (1998-2006, petrol)
  • Electrical equipment
  • Lighting system
  • Interior Lighting — Description and Testing
0
Contents: Interior lighting wiring diagram ⇊ Testing the front ceiling light ⇊ Testing the rear ceiling light ⇊ Testing the luggage compartment light ⇊ Replacing the cup holder light bulb ⇊ Testing the rear door lock switch ⇊
Note: The illustration shows a left-hand drive model; the layout on the right-hand drive model is similar.
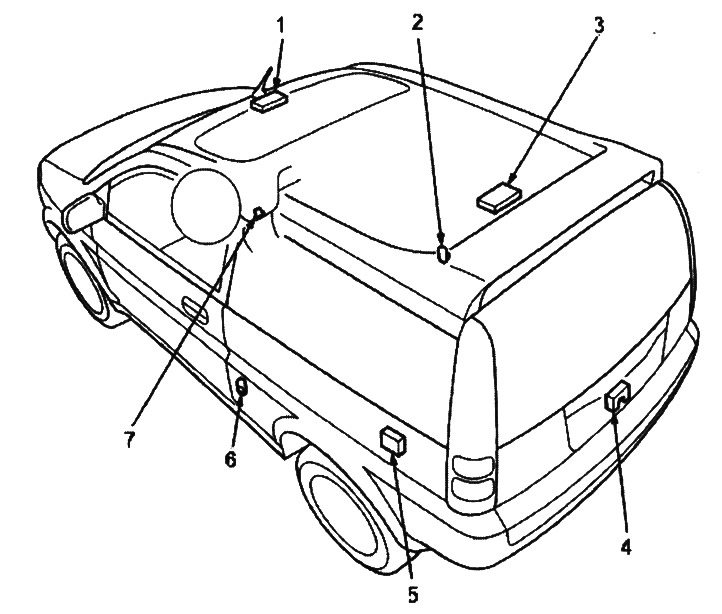

1. FRONT CEILING LIGHT

1. FRONT CEILING LIGHT
2. PASSENGER DOOR SWITCH
3. REAR CEILING LIGHT
4. REAR DOOR LOCK SWITCH
5. LUGGAGE COMPARTMENT LIGHTING
6. DRIVER DOOR SWITCH
7. CUP HOLDER LIGHT


Interior lighting wiring diagram
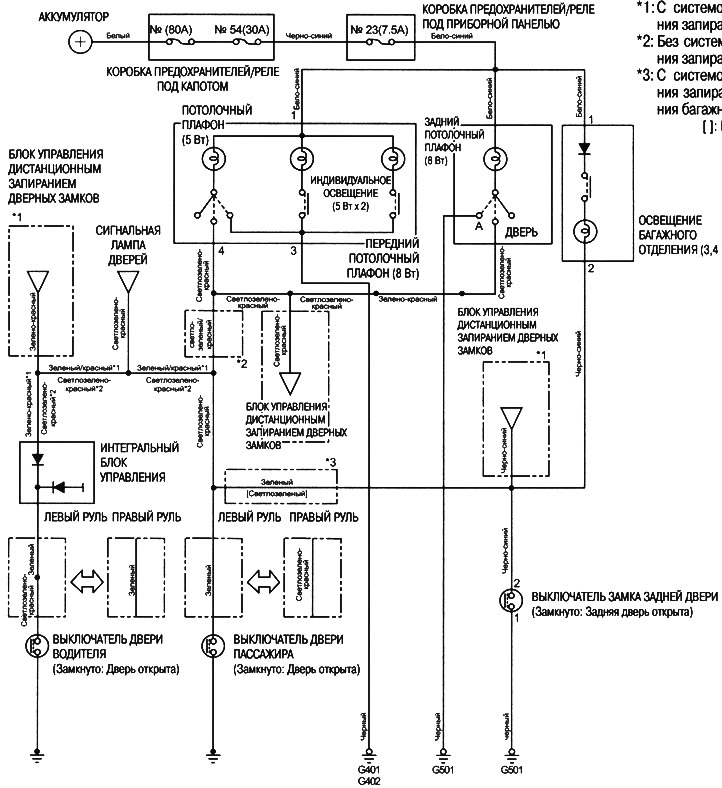


*1: With remote control door locking system

*1: With remote control door locking system
*2: Without remote control door locking system
*3: With remote control door locking system and without luggage compartment light
[]: Right hand drive


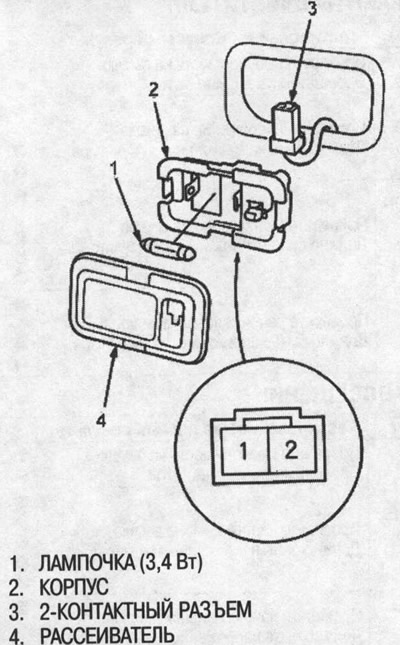
Testing the front ceiling light


1. Turn off the ceiling light.

2. Pry up and remove the diffuser.

3. Remove the two mounting screws from the housing.

4. Disconnect the 4-pin connector and remove the housing.
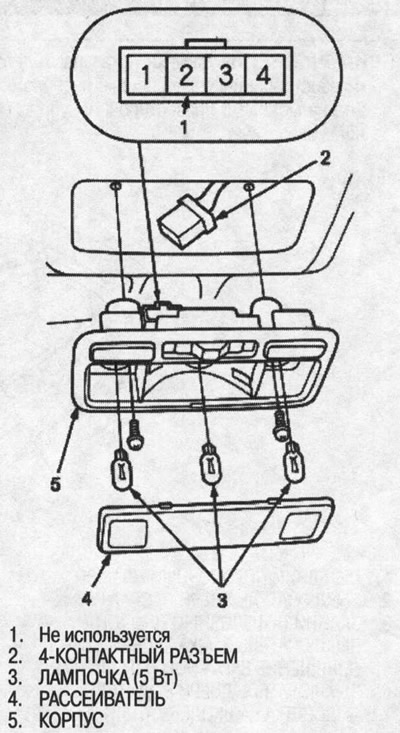
4. Disconnect the 4-pin connector and remove the…


5. Check for conductivity between the contacts in each switch position according to the table.
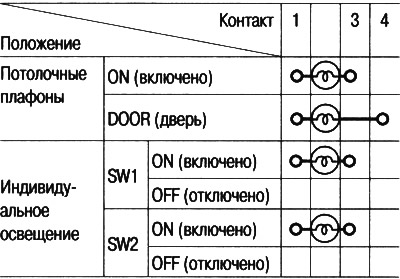
5. Check for conductivity between the contacts in…


Testing the rear ceiling light


1. Turn off the ceiling light.

2. Pry up and remove the diffuser.

3. Remove the two mounting screws from the housing.

4. Disconnect the 3-pin connector from the housing.
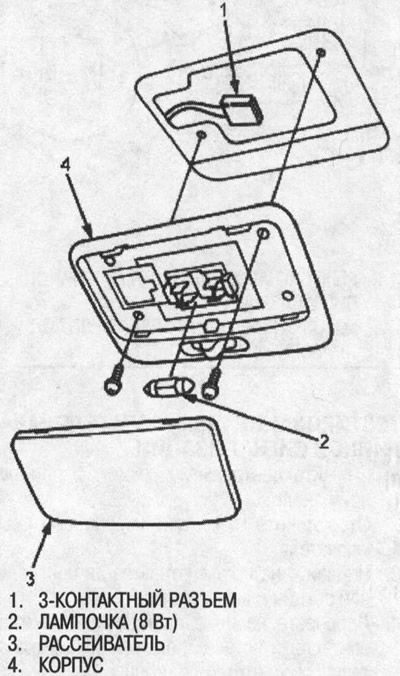
4. Disconnect the 3-pin connector from the…


5. Check for conductivity between the contacts in each switch position according to the table.
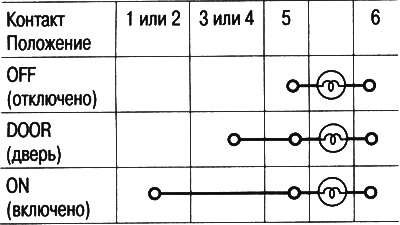


5. Check for conductivity between the contacts in…


5. Check for conductivity between the contacts in…


Testing the luggage compartment light


1. Turn off the lamp.

2. Pry up and remove the diffuser.

3. Pry up and remove the housing, then disconnect the 2-pin connector from the housing.

3. Pry up and remove the housing, then disconnect…


4. Check for conductivity between the contacts in each switch position according to the table.
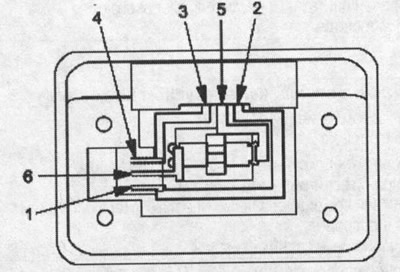
4. Check for conductivity between the contacts in…


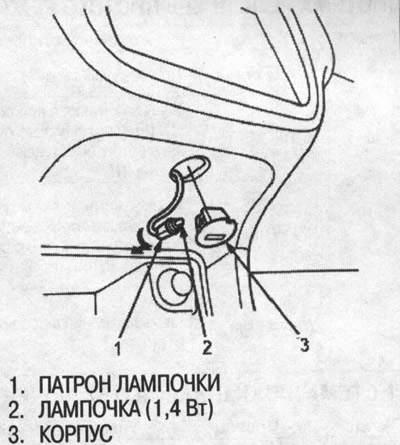
Replacing the cup holder light bulb


1. Remove the center section from the instrument panel (see chap. "Body"),

2. Remove the radio panel.

3. Remove the housing from the front console.

3. Remove the housing from the front console.


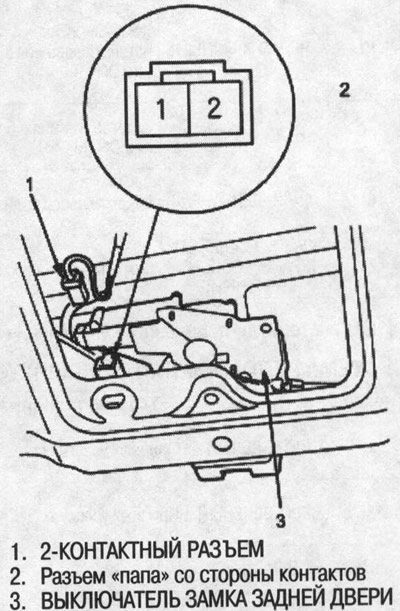
Testing the rear door lock switch


1. Open the back door.

2. Remove the rear door trim panel.

3. Disconnect the 2-pin connector from the rear door lock switch.

3. Disconnect the 2-pin connector from the rear…


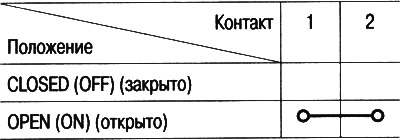
4. Check for conductivity between the contacts in each switch position according to the table.
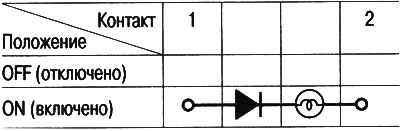
4. Check for conductivity between the contacts in…


(Material obtained from the website: Hondabook.ru)
This article is available at: russian, bulgarian, belarusian, ukrainian, serbian, croatian, romanian, polish, slovak, hungarian
This information has been verified: Emil Safonov
Share with friends:
◀ Previous
HR-V 1: Lighting system
Next ▶

Turn signal and hazard warning lights
High Brake Light Replacement
Instrument cluster light dimmer (model KQ)
Electric headlight corrector (models KG and KE)
Rear fog lights (models KG and KE)
 
See also other articles from Honda manuals:
Interior lighting wiring diagram Honda Accord 6 (1997-2002)
Interior lighting fixtures Honda Civic 6 (1995-2000)
Front interior lighting lamps Honda Fit 1 (2001-2008)
Interior equipment part 1 (lighting) Honda CR-V 2 (2002-2006, petrol)
Interior lighting lamps Honda Avancier 1 (1999-2003, petrol)
Link in different formats to this article
Comments and feedback from visitors
No comments yet


How much will 23 + 36 ?


HR-V 1 (1998-2006, petrol) 
  • General information
  • User manual
  • Maintenance
  • Power unit
  • Engine repair
  • Lubrication system
  • Cooling system
  • Fuel injection and control
  • Power and exhaust system
  • Engine electrical equipment
  • Transmission
  • Clutch
  • Mechanical gearbox
  • Automatic gearbox
  • Rear differential
  • Drive shafts and cardan
  • Chassis and running gear
  • Steering
  • Car suspension
  • Brake system
  • Body and interior
  • Exterior (external elements)
  • Interior (internal elements)
  • Doors, locks and windows
  • Electrical equipment
  • Equipment and devices
  • Lighting system
  • Electrical circuits
HondaBook.ru © 2018–2026 • Mobile version • Sitemap: EN BG BY UA RS HR RO PL SK HU • Feedback • Driver Information • Search system • Bookmark
Accord 3 (1985-1989) • Accord 6 (1997-2002) • Civic 3 and 4 (1983-1991) • Civic 5 and 6 (1991-2000) • Civic 6 (1995-2000) • Civic 7 (2000-2005) • Civic 8 (2005-2011) • Fit 1 (2001-2008) • CR-V 1 (1995-2001) • CR-V 2 (2002-2006) • HR-V 1 (1998-2006) • Avancier 1 (1999-2003) •
 
This website uses cookies to ensure proper functioning. By clicking "OK," you agree.