
HondaBook.ru
Auto companies Volkswagen Auto companies Ford Auto companies Lada Auto companies Skoda Auto companies BMW Auto companies Mazda Auto companies Peugeot
English Русский
Български
Беларускі
Український
Српски
Hrvatski
Română
Polski
Slovenský
Magyar
Bookmark Contacts Sitemap   


Accord Civic Fit / Jazz CR-V HR-V Others Articles
HR-V 1 (1998-2006, petrol)

Replacing carpet (Honda HR-V 1)

  • Main
  • Honda HR-V
  • 1 (1998-2006, petrol)
  • Body and interior
  • Interior (internal elements)
  • Replacing carpet
0
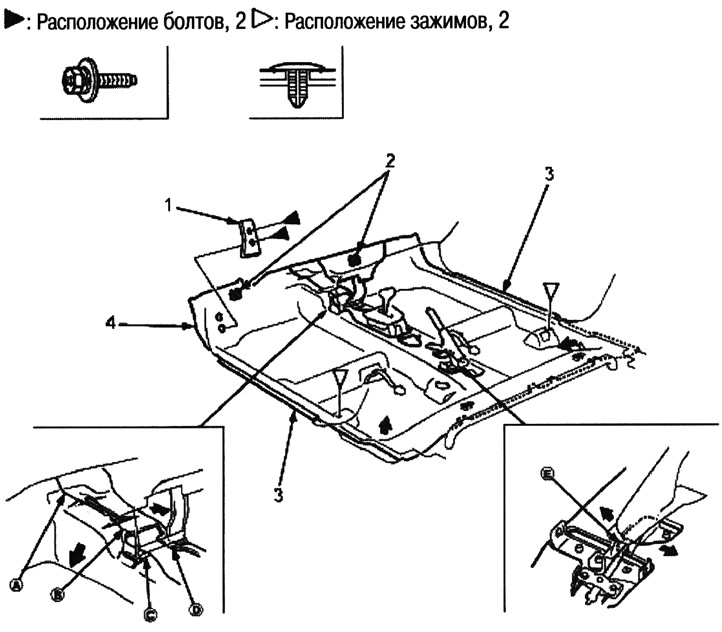
1. foot support; 2. fasteners; 3. retainer; 4.…

1. foot support; 2. fasteners; 3. retainer; 4. carpet


This area contains the Supplemental Restraint System (SRS) components. Review the SRS component locations, precautions, and procedures before performing repairs or maintenance.

Note:
  • Wear protective gloves.
  • Do not damage, crush or twist the carpet.
  • Avoid damaging the instrument panel or other interior trim.


1. Remove:
  • Front seat (both sides) (see below).
  • Rear seat cushion (see below).
  • Front and rear console
  • Wheel arch panel (both sides).
  • Side trim (both sides) (see below).
  • Front seat belt (both sides) (see below).

2. Remove the leg support.

3. Cut out sections (A), (B), (C), (D) and (E) in the carpet, then fold back the carpet.

4. Remove the clips and fasteners, then remove the carpet (picture on the right).

5. Installation is carried out in the reverse order of removal, taking into account the following:
  • Do not damage, crush or twist the carpet.
  • Secure the cut out sections (A), (B), (C), (D) and (E) to the carpet with wire ties.


(Original material on the website www.hondabook.ru)
This article is available at: russian, bulgarian, belarusian, ukrainian, serbian, croatian, romanian, polish, slovak, hungarian
This information has been verified: Emil Safonov
Share with friends:
◀ Previous
HR-V 1: Interior (internal elements)
Next ▶

Removal and installation of interior trim
Interior trim — design description
Replacing the interior rearview mirror
Removal and installation the front and rear console
Removal and installation the instrument cluster
Removal and installation the central section of the instrument panel
Removal and installation the glove box
Removal and installation the top drawer cover
See also other articles from Honda manuals:
Replacing hoses Honda Accord 3 (1985-1989)
Replacing the oil filter and oil Honda Civic 3 and 4 (1983-1991)
Replacing the cabin filter Honda Fit 1 (2001-2008)
Replacing carpet Honda CR-V 2 (2002-2006, petrol)
Checking and replacing fuses Honda Avancier 1 (1999-2003, petrol)
Link in different formats to this article
Comments and feedback from visitors
No comments yet


How much will 28 + 22 ?


HR-V 1 (1998-2006, petrol) 
  • General information
  • User manual
  • Maintenance
  • Power unit
  • Engine repair
  • Lubrication system
  • Cooling system
  • Fuel injection and control
  • Power and exhaust system
  • Engine electrical equipment
  • Transmission
  • Clutch
  • Mechanical gearbox
  • Automatic gearbox
  • Rear differential
  • Drive shafts and cardan
  • Chassis and running gear
  • Steering
  • Car suspension
  • Brake system
  • Body and interior
  • Exterior (external elements)
  • Interior (internal elements)
  • Doors, locks and windows
  • Electrical equipment
  • Equipment and devices
  • Lighting system
  • Electrical circuits
HondaBook.ru © 2018–2026 • Mobile version • Sitemap: EN BG BY UA RS HR RO PL SK HU • Feedback • Driver Information • Search system • Bookmark
Accord 3 (1985-1989) • Accord 6 (1997-2002) • Civic 3 and 4 (1983-1991) • Civic 5 and 6 (1991-2000) • Civic 6 (1995-2000) • Civic 7 (2000-2005) • Civic 8 (2005-2011) • Fit 1 (2001-2008) • CR-V 1 (1995-2001) • CR-V 2 (2002-2006) • HR-V 1 (1998-2006) • Avancier 1 (1999-2003) •
 
This website uses cookies to ensure proper functioning. By clicking "OK," you agree.