
HondaBook.ru
Auto companies Volkswagen Auto companies Ford Auto companies Lada Auto companies Skoda Auto companies BMW Auto companies Mazda Auto companies Peugeot
English Русский
Български
Беларускі
Український
Српски
Hrvatski
Română
Polski
Slovenský
Magyar
Bookmark Contacts Sitemap   


Accord Civic Fit / Jazz CR-V HR-V Others Articles
HR-V 1 (1998-2006, petrol)

Rear door — removal and installation (Honda HR-V 1)

  • Main
  • Honda HR-V
  • 1 (1998-2006, petrol)
  • Body and interior
  • Doors, locks and windows
  • Rear door — removal and installation
0
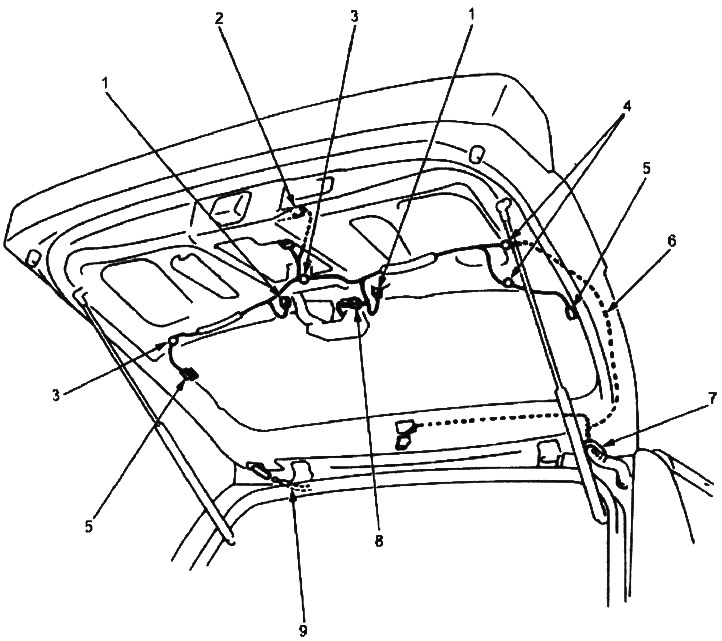
1. Rear license plate light connector; 2. Rear…

1. Rear license plate light connector; 2. Rear door lock actuator connector; 3. harness clamp; 4. harness clamps; 5. Rear window heater connector; 6. tourniquet; 7. rubber bushing; 8. Rear window wiper motor connector; 9. rear window washer tube


Note:
  • When removing the rear door, it is a good idea to have an assistant.
  • Be careful not to scratch the back door.
  • Wear protective gloves.


1. Remove the rear door trim.

2. Disconnect the rear window wiper motor connector, rear window defogger connector, rear license plate lamp connector, rear door lock switch connector, rear door lock actuator connector and rear window washer pipe. Remove the harness clamps, remove the harness from the door.

3. Remove the support pillar from the bracket. Unscrew the bolts, then remove the rear door (pictured below on the right).
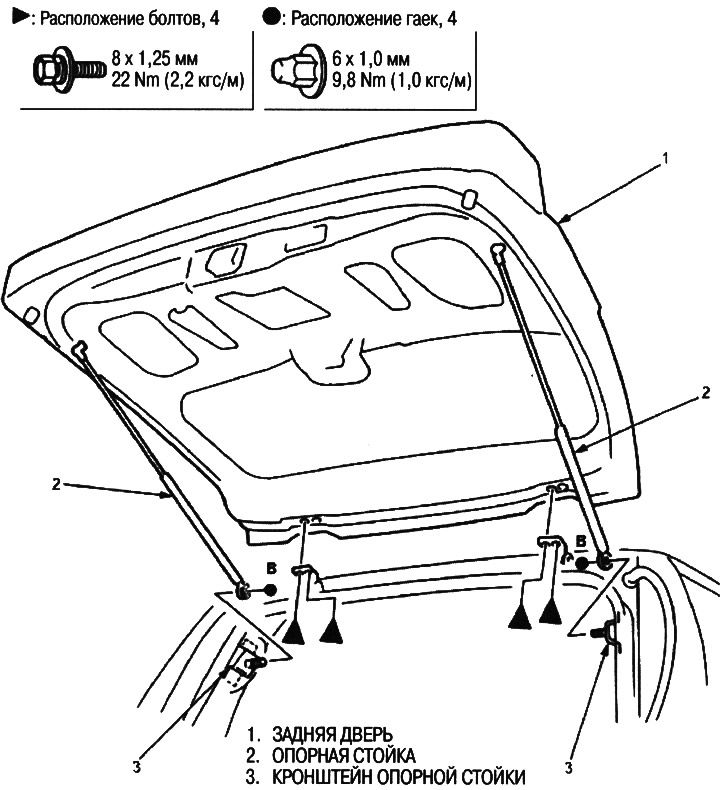
3. Remove the support pillar from the bracket.…


4. Remove the support pillar from the rear door.


5. Installation is carried out in the reverse order of removal, taking into account the following:
  • Place connectors and wiring harnesses correctly.
  • Make sure the rear door opens properly and locks securely.
  • Adjust the fit of the rear door.
This article is available at: russian, bulgarian, belarusian, ukrainian, serbian, croatian, romanian, polish, slovak, hungarian
This information has been verified: Emil Safonov
Share with friends:
◀ Previous
HR-V 1: Doors, locks and windows
Next ▶

Replacing the hatch lock assembly and hinges
Replacing the drain pipe
Replacing the main hatch seal
Replacing glass in the sunroof
Roof hatch — design description
Rear door — adjustment
Replacing the rear door support pillar
Installing the rear door seal
Opening devices — arrangement of components
Hood lock cable
See also other articles from Honda manuals:
Rear wheel bearings Honda Accord 3 (1985-1989)
Rear door — removal, installation and adjustment Honda Civic 3 and 4 (1983-1991)
Rear side door — adjustment Honda Fit 1 (2001-2008)
Rear side door, component layout Honda CR-V 2 (2002-2006, petrol)
Rear door — checks and adjustments Honda Avancier 1 (1999-2003, petrol)
Link in different formats to this article
Comments and feedback from visitors
No comments yet


How much will 21 + 20 ?


HR-V 1 (1998-2006, petrol) 
  • General information
  • User manual
  • Maintenance
  • Power unit
  • Engine repair
  • Lubrication system
  • Cooling system
  • Fuel injection and control
  • Power and exhaust system
  • Engine electrical equipment
  • Transmission
  • Clutch
  • Mechanical gearbox
  • Automatic gearbox
  • Rear differential
  • Drive shafts and cardan
  • Chassis and running gear
  • Steering
  • Car suspension
  • Brake system
  • Body and interior
  • Exterior (external elements)
  • Interior (internal elements)
  • Doors, locks and windows
  • Electrical equipment
  • Equipment and devices
  • Lighting system
  • Electrical circuits
HondaBook.ru © 2018–2026 • Mobile version • Sitemap: EN BG BY UA RS HR RO PL SK HU • Feedback • Driver Information • Search system • Bookmark
Accord 3 (1985-1989) • Accord 6 (1997-2002) • Civic 3 and 4 (1983-1991) • Civic 5 and 6 (1991-2000) • Civic 6 (1995-2000) • Civic 7 (2000-2005) • Civic 8 (2005-2011) • Fit 1 (2001-2008) • CR-V 1 (1995-2001) • CR-V 2 (2002-2006) • HR-V 1 (1998-2006) • Avancier 1 (1999-2003) •
 
This website uses cookies to ensure proper functioning. By clicking "OK," you agree.