
HondaBook.ru
Auto companies Volkswagen Auto companies Ford Auto companies Lada Auto companies Skoda Auto companies BMW Auto companies Mazda Auto companies Peugeot
English Русский
Български
Беларускі
Український
Српски
Hrvatski
Română
Polski
Slovenský
Magyar
Bookmark Contacts Sitemap   


Accord Civic Fit / Jazz CR-V HR-V Others Articles
Avancier 1 (1999-2003, petrol)

Side Impact Sensor — Removal and Installation (Honda Avancier 1)

  • Main
  • Honda
  • Avancier 1 (1999-2003, petrol)
  • Electrical equipment
  • Equipment and devices
  • Side Impact Sensor — Removal and Installation
0
Contents: Removal ⇊ Installation ⇊
Caution: Before starting work, disconnect the cables from the battery and wait at least 3 minutes.


Removal


1. Disconnect the driver and front passenger side airbag connectors, see above.

2. Remove the front seat side impact sensor.

3. Remove the front side trim and fold back the floor covering from the threshold side.

4. Using a T30 head, unscrew the 2 TORX bolts of the side impact sensor.

Avoid striking the sensor or adjacent parts. Do not use impact wrenches.

Do not loosen the sensor mounting screws.
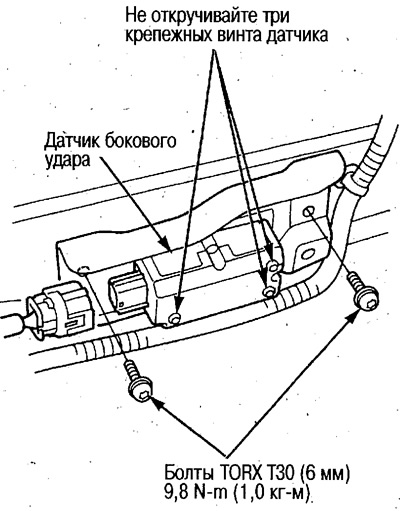
Do not loosen the sensor mounting screws.


5. Remove the side impact sensor.

6. Disconnect the IDi or IPi connector from the sensor.
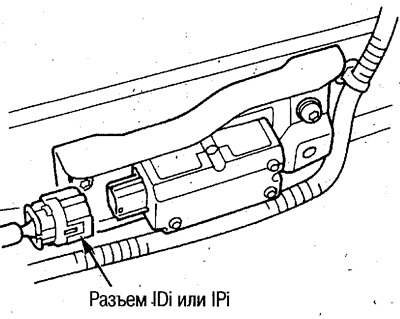
6. Disconnect the IDi or IPi connector from the…


Installation


Installation is carried out in the reverse order of removal.


Tighten the TORX bolts to the required torque.

After installation, connect the cables to the battery and perform the following check:

Turn the ignition switch to the ON (II) position and check that the SRS indicator light comes on and goes out after 6 seconds.
This article is available at: russian, bulgarian, belarusian, ukrainian, serbian, croatian, romanian, polish, slovak, hungarian
This information has been verified: Emil Safonov
Share with friends:
◀ Previous
Avancier 1: Equipment and devices
Next ▶

SRS seat belt and pretensioner unit — removal and installation
Seat belts and pretensioners — removal and installation
Wiring Coil — Removal and Installation
Side airbags — removal and installation
Front passenger airbag — removal and installation
Navigation system — component layout
Navigation system — electrical diagram
Connector Locations — Pin Assignments
Removal the navigation system switch
Removal the navigation system display unit
See also other articles from Honda manuals:
Oil pressure sensor Honda Accord 3 (1985-1989)
Coolant Temperature Sensor — Checking and Replacing Honda Civic 3 and 4 (1983-1991)
Removal and installation the side SRS sensor Honda Fit 1 (2001-2008)
Coolant temperature sensor Honda CR-V 1 (1995-2001, petrol)
Oil Pressure Sensor — Testing Honda HR-V 1 (1998-2006, petrol)
Link in different formats to this article
Comments and feedback from visitors
No comments yet


How much will 12 + 29 ?


Avancier 1 (1999-2003, petrol) 
  • General information
  • Controls and instruments
  • User manual
  • Power unit
  • Engine maintenance
  • Engine repair
  • Cooling system
  • Engine management
  • Power and exhaust system
  • Transmission
  • Automatic gearbox
  • Drive shafts and differential
  • Chassis and running gear
  • Steering
  • Car suspension
  • Brake system
  • Body and interior
  • Doors, locks and windows
  • Interior (internal elements)
  • Exterior (external elements)
  • Air conditioner
  • Electrical equipment
  • Power devices
  • Equipment and devices
  • Headlights and lighting
  • Electrical circuits
HondaBook.ru © 2018–2026 • Mobile version • Sitemap: EN BG BY UA RS HR RO PL SK HU • Feedback • Driver Information • Search system • Bookmark
Accord 3 (1985-1989) • Accord 6 (1997-2002) • Civic 3 and 4 (1983-1991) • Civic 5 and 6 (1991-2000) • Civic 6 (1995-2000) • Civic 7 (2000-2005) • Civic 8 (2005-2011) • Fit 1 (2001-2008) • CR-V 1 (1995-2001) • CR-V 2 (2002-2006) • HR-V 1 (1998-2006) • Avancier 1 (1999-2003) •
 
This website uses cookies to ensure proper functioning. By clicking "OK," you agree.