
HondaBook.ru
Auto companies Volkswagen Auto companies Ford Auto companies Lada Auto companies Skoda Auto companies BMW Auto companies Mazda Auto companies Peugeot
English Русский
Български
Беларускі
Український
Српски
Hrvatski
Română
Polski
Slovenský
Magyar
Bookmark Contacts Sitemap   


Accord Civic Fit / Jazz CR-V HR-V Others Articles
Avancier 1 (1999-2003, petrol)

Air intake motor (Honda Avancier 1)

  • Main
  • Honda
  • Avancier 1 (1999-2003, petrol)
  • Body and interior
  • Air conditioner
  • Air intake motor
0
Contents: Removal and installation ⇊ Examination ⇊

Removal and installation


1. Remove the glove box, see chapter Body.

2. Disconnect the connector, unscrew the screws and remove the air intake motor.
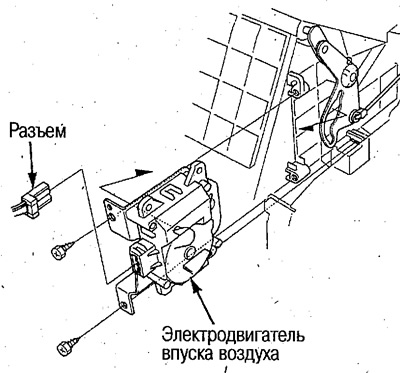
2. Disconnect the connector, unscrew the screws…


3. Installation is carried out in the reverse order of removal, taking into account the following.

After installation, check the operation of the electric motor using the air intake switch.

Examination


1. Disconnect the 7-pin connector from the air intake motor.

2. Connect the (+) wire from the battery to terminal #1 of the connector, and the (-) wire to terminals #5 or 7, and make sure the electric motor is running.
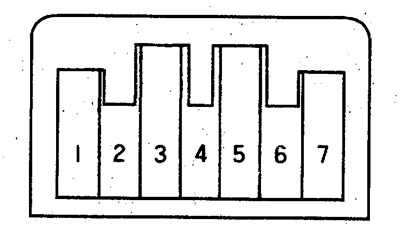
2. Connect the (+) wire from the battery to…


If you connect the (-) wire first, the electric motor will not work. Disconnect the wire and reconnect it, the electric motor should work.


3. If the electric motor does not work as described in point 2, remove it and check the operation of the traction.

4. If the rod moves freely, replace the air intake motor.
This article is available at: russian, bulgarian, belarusian, ukrainian, serbian, croatian, romanian, polish, slovak, hungarian
This information has been verified: Emil Safonov
Share with friends:
◀ Previous
Avancier 1: Air conditioner
Next ▶

Blower mode electric motor
Mixing flap motor — check
Mixing flap motor — removal and installation
Automatic air conditioning control unit contact locations
Automatic air conditioner — electrical diagram
Cabin air temperature sensor
Outside air temperature sensor
Sunlight intensity sensor
Evaporator sensor
Power transistor
See also other articles from Honda manuals:
Intake manifold — removal and installation Honda Accord 3 (1985-1989)
Intake Air Temperature Control Valve Control Honda Civic 3 and 4 (1983-1991)
Intake manifold Honda Fit 1 (2001-2008)
Motor oils — the difficulties of choice Honda CR-V 1 (1995-2001, petrol)
Replacing the intake manifold Honda HR-V 1 (1998-2006, petrol)
Link in different formats to this article
Comments and feedback from visitors
No comments yet


How much will 18 + 29 ?


Avancier 1 (1999-2003, petrol) 
  • General information
  • Controls and instruments
  • User manual
  • Power unit
  • Engine maintenance
  • Engine repair
  • Cooling system
  • Engine management
  • Power and exhaust system
  • Transmission
  • Automatic gearbox
  • Drive shafts and differential
  • Chassis and running gear
  • Steering
  • Car suspension
  • Brake system
  • Body and interior
  • Doors, locks and windows
  • Interior (internal elements)
  • Exterior (external elements)
  • Air conditioner
  • Electrical equipment
  • Power devices
  • Equipment and devices
  • Headlights and lighting
  • Electrical circuits
HondaBook.ru © 2018–2026 • Mobile version • Sitemap: EN BG BY UA RS HR RO PL SK HU • Feedback • Driver Information • Search system • Bookmark
Accord 3 (1985-1989) • Accord 6 (1997-2002) • Civic 3 and 4 (1983-1991) • Civic 5 and 6 (1991-2000) • Civic 6 (1995-2000) • Civic 7 (2000-2005) • Civic 8 (2005-2011) • Fit 1 (2001-2008) • CR-V 1 (1995-2001) • CR-V 2 (2002-2006) • HR-V 1 (1998-2006) • Avancier 1 (1999-2003) •
 
This website uses cookies to ensure proper functioning. By clicking "OK," you agree.