
Contents: Removal and installation ⇊ Examination ⇊
Removal and installation
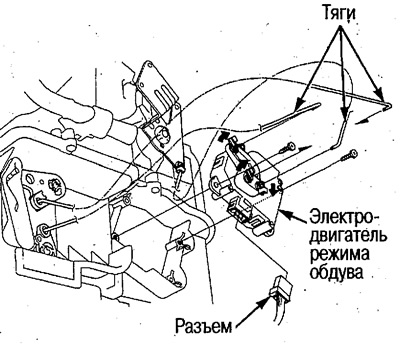
1. Disconnect the connector, remove the rods, unscrew the screws and remove the blower mode electric motor.
2. Installation is carried out in the reverse order of removal, taking into account the following.
After installation, check the operation of the electric motor using the blower mode switch.
Examination
1. Disconnect the 7-pin connector from the blower motor.
2. Connect the (+) wire from the battery to terminal #2 of the connector, and the (-) wire to terminal #1, and make sure that the electric motor switches to the VENT position. If you connect the wires the other way around, the electric motor should switch to the DEF position (defrosting the windshield).
Attention: After switching the electric motor, immediately disconnect the wires from the connector.
3. Connect the wires to contacts No.1 and No.2 of the connector, and while the electric motor is running, check the conductivity between contact No.7 and Nos. 3, 4, 5 and 6.
Use a digital tester.
4. If the electric motor does not work as described in point 2, remove it and check the operation of the rods.
5. If the rods move freely, replace the blower motor.