
HondaBook.ru
Auto companies Volkswagen Auto companies Ford Auto companies Lada Auto companies Skoda Auto companies BMW Auto companies Mazda Auto companies Peugeot
English Русский
Български
Беларускі
Український
Српски
Hrvatski
Română
Polski
Slovenský
Magyar
Bookmark Contacts Sitemap   


Accord Civic Fit / Jazz CR-V HR-V Others Articles
HR-V 1 (1998-2006, petrol)

Replacing the wheel arch trim (Honda HR-V 1)

  • Main
  • Honda HR-V
  • 1 (1998-2006, petrol)
  • Body and interior
  • Exterior (external elements)
  • Replacing the wheel arch trim
0
Note: Once bent, the steel core of the wheel arch trim cannot be restored to its original shape. Replace the wheel arch trim after bending the steel core.


1. Remove the wheel arch trim by pulling it.

2. Clean the contact surface of the body with a sponge soaked in alcohol. After cleaning, do not allow oil, grease or water to come into contact with the clean surface.

3. Apply clean sealant into the wheel well trim groove from edge to edge.

4. Install the wheel arch trim.
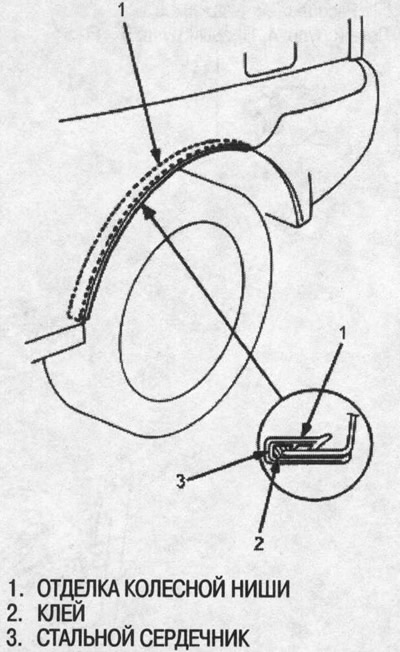
4. Install the wheel arch trim.


Sealant: Cemedines P/N 08712-0004 or equivalent.

5. Scrape or wipe off excess sealant with a cloth. Remove sealant from the paintwork with a soft cloth soaked in alcohol.

Replacing the protective film


Align the protective backing of the film with the front part of the trailing edge of the wing as shown in the picture, then stick the protective film. Remove the protective backing.
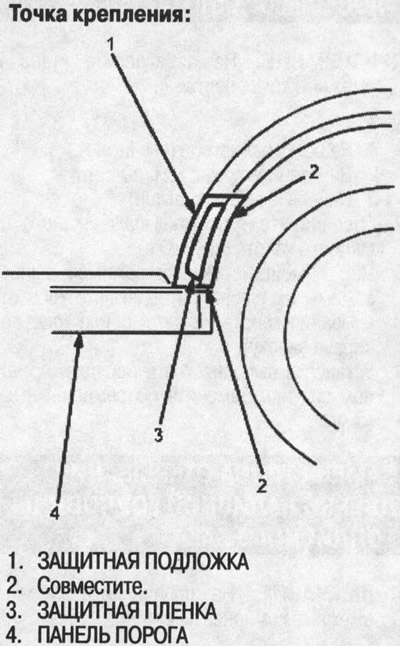
Align the protective backing of the film with the…


Note:
  • Before gluing the film, clean the surface of the rear wing with a sponge soaked in alcohol.
  • After cleaning, do not allow oil, grease or water to come into contact with the surface.


9. When gluing, do not allow folds to form on the protective film.

(Full text available on the portal: «HondaBook»)
This article is available at: russian, bulgarian, belarusian, ukrainian, serbian, croatian, romanian, polish, slovak, hungarian
This information has been verified: Emil Safonov
Share with friends:
◀ Previous
HR-V 1: Exterior (external elements)
Next ▶

Removal and installation the outlet
Removal and installation the fuel line protective cover
Disassembling the side trim of the bottom
Replacing the door threshold
Roof Molding Replacement
Replacement of the emblem
Replacing the subframe
Frame repair diagram
Dimensions of the upper part of the body
Rear pillar gutter location
See also other articles from Honda manuals:
Replacing the shoes of the rear wheel drum brake mechanisms Honda Accord 6 (1997-2002)
Replacing the front wheel arch protector Honda Civic 8 (2005-2011)
Adjusting the position of the steering wheel Honda Fit 1 (2001-2008)
Replacing steering knuckle/hub/wheel bearing Honda CR-V 2 (2002-2006, petrol)
Removal and installation front wheel arch trim Honda Avancier 1 (1999-2003, petrol)
Link in different formats to this article
Comments and feedback from visitors
No comments yet


How much will 37 + 31 ?


HR-V 1 (1998-2006, petrol) 
  • General information
  • User manual
  • Maintenance
  • Power unit
  • Engine repair
  • Lubrication system
  • Cooling system
  • Fuel injection and control
  • Power and exhaust system
  • Engine electrical equipment
  • Transmission
  • Clutch
  • Mechanical gearbox
  • Automatic gearbox
  • Rear differential
  • Drive shafts and cardan
  • Chassis and running gear
  • Steering
  • Car suspension
  • Brake system
  • Body and interior
  • Exterior (external elements)
  • Interior (internal elements)
  • Doors, locks and windows
  • Electrical equipment
  • Equipment and devices
  • Lighting system
  • Electrical circuits
HondaBook.ru © 2018–2026 • Mobile version • Sitemap: EN BG BY UA RS HR RO PL SK HU • Feedback • Driver Information • Search system • Bookmark
Accord 3 (1985-1989) • Accord 6 (1997-2002) • Civic 3 and 4 (1983-1991) • Civic 5 and 6 (1991-2000) • Civic 6 (1995-2000) • Civic 7 (2000-2005) • Civic 8 (2005-2011) • Fit 1 (2001-2008) • CR-V 1 (1995-2001) • CR-V 2 (2002-2006) • HR-V 1 (1998-2006) • Avancier 1 (1999-2003) •
 
This website uses cookies to ensure proper functioning. By clicking "OK," you agree.