HondaBook.ru
Auto companies Volkswagen Auto companies Ford Auto companies Lada Auto companies Skoda Auto companies BMW Auto companies Mazda Auto companies Peugeot
English Русский
Български
Беларускі
Український
Српски
Hrvatski
Română
Polski
Slovenský
Magyar
Bookmark Contacts Sitemap   


Accord Civic Fit / Jazz CR-V HR-V Others Articles
Avancier 1 (1999-2003, petrol)

Headlights — replacement, fault diagnostics (Honda Avancier 1)

  • Main
  • Honda
  • Avancier 1 (1999-2003, petrol)
  • Electrical equipment
  • Headlights and lighting
  • Headlights — replacement, fault diagnostics
0
Contents: Replacing lamps ⇊ Replacement of gas discharge lamps ⇊ Diagnostics of malfunctions of gas…⇊

Replacing lamps


1. Remove the front bumper (see chapter Body).

2. Disconnect all headlight connectors.

3. Remove the 3 mounting screws and remove the headlight assembly and the upper corner beam of the front bumper.

4. Remove 2 bolts from the top corner beam.
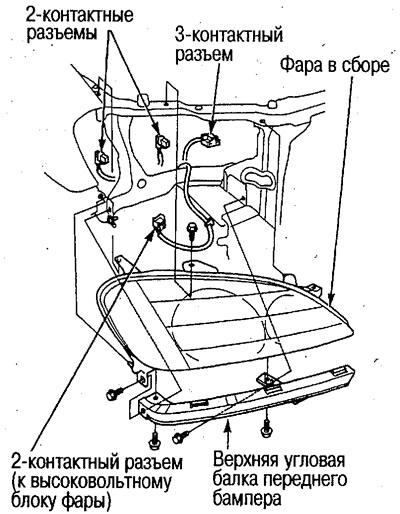
4. Remove 2 bolts from the top corner beam.

  • Headlight bulbs: 55/35 W
  • Front parking light bulbs: 5 W
  • Front turn signal lamps: 21 W

5. Install in the reverse order of removal.

6. After installation, adjust the headlight beam direction.
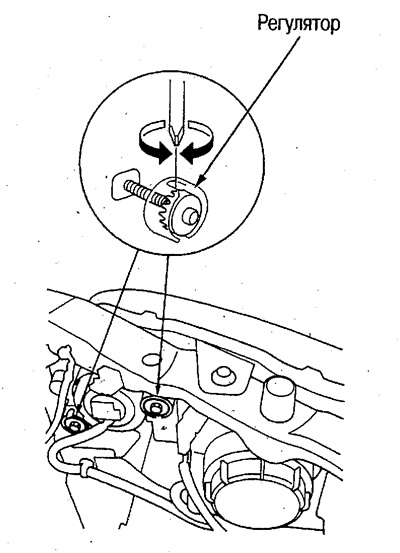
6. After installation, adjust the headlight beam…


Before adjustment:
  • Check the horizontality of the test site.
  • Check that the tire pressure is correct.
  • Place one person (weight approx. 55 kg) in the driver's seat.
  • Unload heavy objects from the rear of the vehicle.

Attention.
  • When the headlights are on, the lenses become very hot, so do not cover them for more than 3 minutes.
  • Since the outer headlight lenses are made of plastic, do not cover them for a long time, as they may become deformed.


Replacement of gas discharge lamps


Caution: When the headlights are turned on, high voltage briefly appears in the gas discharge lamp socket, so pay attention to the following points when replacing the lamp.


Do not perform work in areas exposed to snow or rain, and do not perform work with wet hands.

Avoid touching the glass surface of the lamp and make sure that no oil gets on it.

1. Turn the light switch to the OFF position and disconnect the battery cables.

2. Unscrew one TORX screw using a TORX T20 key and remove the cover.
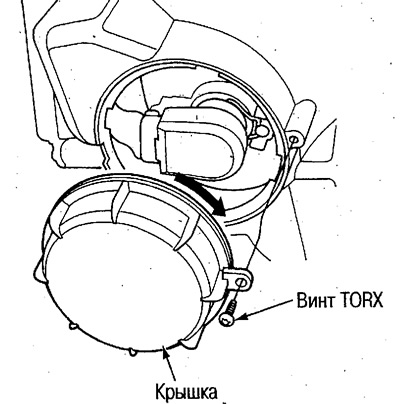
2. Unscrew one TORX screw using a TORX T20 key…

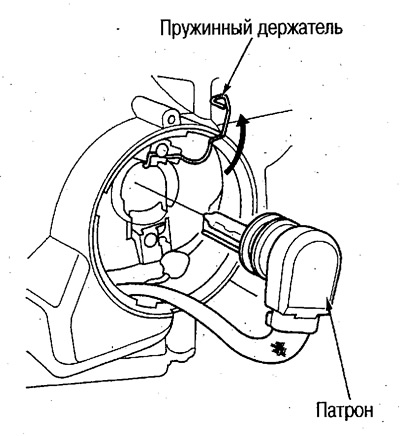
3. Remove the spring holder, remove the lamp.
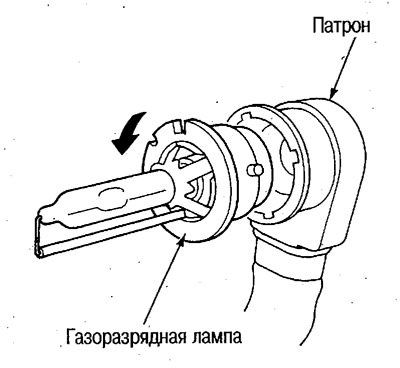
3. Remove the spring holder, remove the lamp.


4. Remove the gas discharge lamp from the socket.


5. After replacing the bulb, adjust the aim of the headlights.

Diagnostics of malfunctions of gas discharge headlights


The low beam headlights do not work


Before diagnostics, check the serviceability of fuses No.43 (20A) and No.45 (20A) in the relay box.
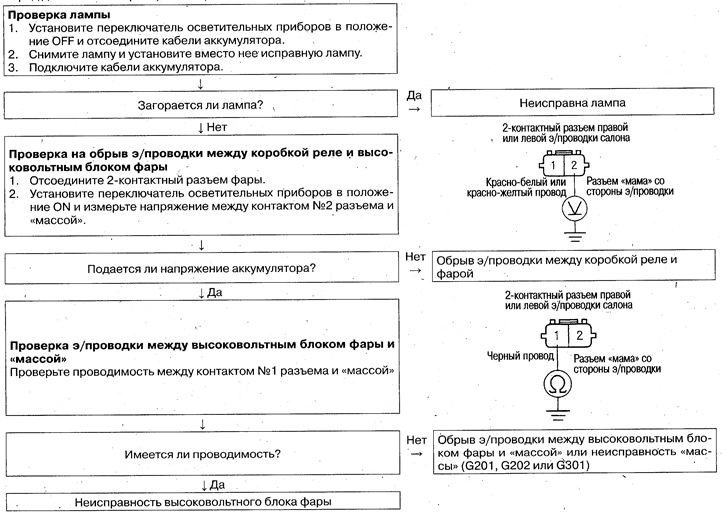
Before diagnostics, check the serviceability of…

Replacing the high voltage headlight unit


1. Turn the light switch to the OFF position and disconnect the battery cables.

2. Remove the headlight assembly (see above).

3. Remove the gas discharge lamp from the socket (see above).

4. Disconnect the plug from the headlight assembly.

5. Unscrew 3 screws and remove the unit from the headlight assembly.
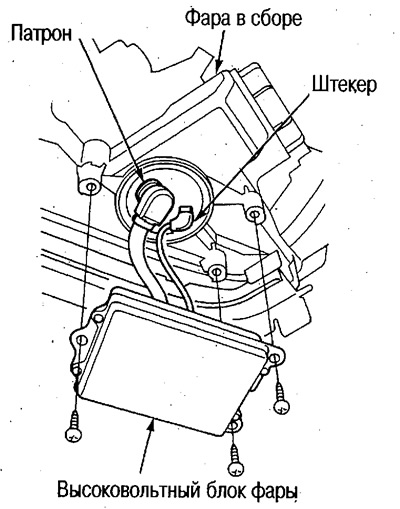
5. Unscrew 3 screws and remove the unit from the…


6. Install in the reverse order of removal.
This article is available at: russian, bulgarian, belarusian, ukrainian, serbian, croatian, romanian, polish, slovak, hungarian
This information has been verified: Emil Safonov
Share with friends:
◀ Previous
Avancier 1: Headlights and lighting
Next ▶

Checking the Light/Turn Signal/Fog Light Switch
Lighting system wiring diagram
Location of lighting system components
Turn signal repeaters — replacement
Registration plate lighting lamp
Rear combination lights
Reversing lights — wiring diagram
Fog lights
See also other articles from Honda manuals:
Electronic ignition — description and diagnostics Honda Accord 3 (1985-1989)
Carburetor diagnostics and repair — general information Honda Civic 3 and 4 (1983-1991)
Automatic transmission diagnostics Honda Fit 1 (2001-2008)
Headlights — Bulb Replacement Honda CR-V 1 (1995-2001, petrol)
Table of fault codes Honda HR-V 1 (1998-2006, petrol)
Link in different formats to this article
Comments and feedback from visitors
No comments yet


How much will 44 + 42 ?


Avancier 1 (1999-2003, petrol) 
  • General information
  • Controls and instruments
  • User manual
  • Power unit
  • Engine maintenance
  • Engine repair
  • Cooling system
  • Engine management
  • Power and exhaust system
  • Transmission
  • Automatic gearbox
  • Drive shafts and differential
  • Chassis and running gear
  • Steering
  • Car suspension
  • Brake system
  • Body and interior
  • Doors, locks and windows
  • Interior (internal elements)
  • Exterior (external elements)
  • Air conditioner
  • Electrical equipment
  • Power devices
  • Equipment and devices
  • Headlights and lighting
  • Electrical circuits
HondaBook.ru © 2018–2026 • Mobile version • Sitemap: EN BG BY UA RS HR RO PL SK HU • Feedback • Driver Information • Search system • Bookmark
Accord 3 (1985-1989) • Accord 6 (1997-2002) • Civic 3 and 4 (1983-1991) • Civic 5 and 6 (1991-2000) • Civic 6 (1995-2000) • Civic 7 (2000-2005) • Civic 8 (2005-2011) • Fit 1 (2001-2008) • CR-V 1 (1995-2001) • CR-V 2 (2002-2006) • HR-V 1 (1998-2006) • Avancier 1 (1999-2003) •
 
This website uses cookies to ensure proper functioning. By clicking "OK," you agree.