
HondaBook.ru
Auto companies Volkswagen Auto companies Ford Auto companies Lada Auto companies Skoda Auto companies BMW Auto companies Mazda Auto companies Peugeot
English Русский
Български
Беларускі
Український
Српски
Hrvatski
Română
Polski
Slovenský
Magyar
Bookmark Contacts Sitemap   


Accord Civic Fit / Jazz CR-V HR-V Others Articles
Avancier 1 (1999-2003, petrol)

Checking the horn switch (Honda Avancier 1)

  • Main
  • Honda
  • Avancier 1 (1999-2003, petrol)
  • Electrical equipment
  • Equipment and devices
  • Checking the horn switch
0
If there are components of the additional passive safety system nearby, during the execution of work see chapter Supplemental Restraint System (SRS).

1. Remove the steering column cover (see chapter Steering).

2. Disconnect the 4-pin connector from the coil wire.
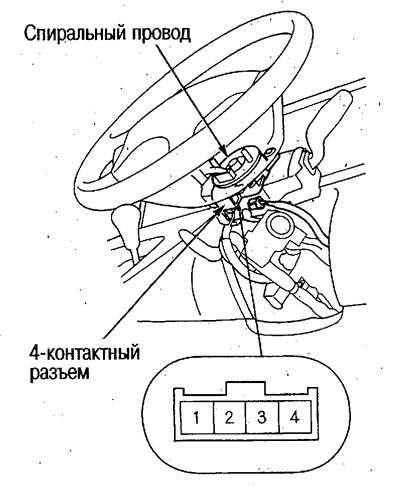
2. Disconnect the 4-pin connector from the coil…


3. Check the continuity between contact No.2 of the 4-pin connector and ground in each switch position and make sure that continuity exists only in the case shown by the line in the table.
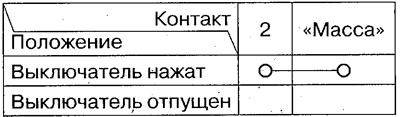
3. Check the continuity between contact No.2 of…

If there is continuity, the horn switch is working properly.

If there is no conductivity, proceed to step 4.

4. Check the continuity between contact No.2 of the 4-pin connector and the contact of the horn switch on the steering wheel.
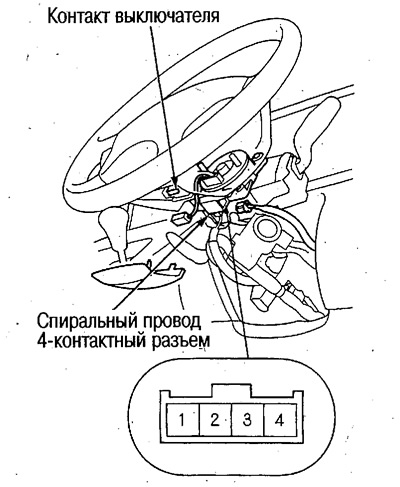
4. Check the continuity between contact No.2 of…


If there is no continuity, replace the coil wire.


If there is continuity, replace the steering wheel.

5. After completing the work, make sure of the following:

The airbag indicator lamp on the instrument cluster comes on after turning the ignition key to the ON (II) position and goes out after 6 seconds.

The horns are working.
This article is available at: russian, bulgarian, belarusian, ukrainian, serbian, croatian, romanian, polish, slovak, hungarian
This information has been verified: Emil Safonov
Share with friends:
◀ Previous
Avancier 1: Equipment and devices
Next ▶

Checking the horns
Horns — Wiring Diagram
Horns — Component Locations
Rear Window Defogger — Checking the Noise Suppressing Condenser
Rear Window Defogger — Heating Element Repair
Power Seats — Component Locations
Power Seats — Wiring Diagram
Checking the Power Seat Switch
Checking the electric motors of the electric seat
Windscreen wipers/washers — component locations
See also other articles from Honda manuals:
Checking the air conditioner switch signal Honda Accord 3 (1985-1989)
Checking and replacing the brake fluid level switch sensor Honda Civic 6 (1995-2000)
Checking the Reverse Light Switch Honda Fit 1 (2001-2008)
Battery — Checking, Removing and Installing Honda CR-V 1 (1995-2001, petrol)
Horn switch Honda HR-V 1 (1998-2006, petrol)
Link in different formats to this article
Comments and feedback from visitors
No comments yet


How much will 41 + 48 ?


Avancier 1 (1999-2003, petrol) 
  • General information
  • Controls and instruments
  • User manual
  • Power unit
  • Engine maintenance
  • Engine repair
  • Cooling system
  • Engine management
  • Power and exhaust system
  • Transmission
  • Automatic gearbox
  • Drive shafts and differential
  • Chassis and running gear
  • Steering
  • Car suspension
  • Brake system
  • Body and interior
  • Doors, locks and windows
  • Interior (internal elements)
  • Exterior (external elements)
  • Air conditioner
  • Electrical equipment
  • Power devices
  • Equipment and devices
  • Headlights and lighting
  • Electrical circuits
HondaBook.ru © 2018–2026 • Mobile version • Sitemap: EN BG BY UA RS HR RO PL SK HU • Feedback • Driver Information • Search system • Bookmark
Accord 3 (1985-1989) • Accord 6 (1997-2002) • Civic 3 and 4 (1983-1991) • Civic 5 and 6 (1991-2000) • Civic 6 (1995-2000) • Civic 7 (2000-2005) • Civic 8 (2005-2011) • Fit 1 (2001-2008) • CR-V 1 (1995-2001) • CR-V 2 (2002-2006) • HR-V 1 (1998-2006) • Avancier 1 (1999-2003) •
 
This website uses cookies to ensure proper functioning. By clicking "OK," you agree.